

Salted Caramel Peach Hand Pies: Your Ultimate Summer Treat
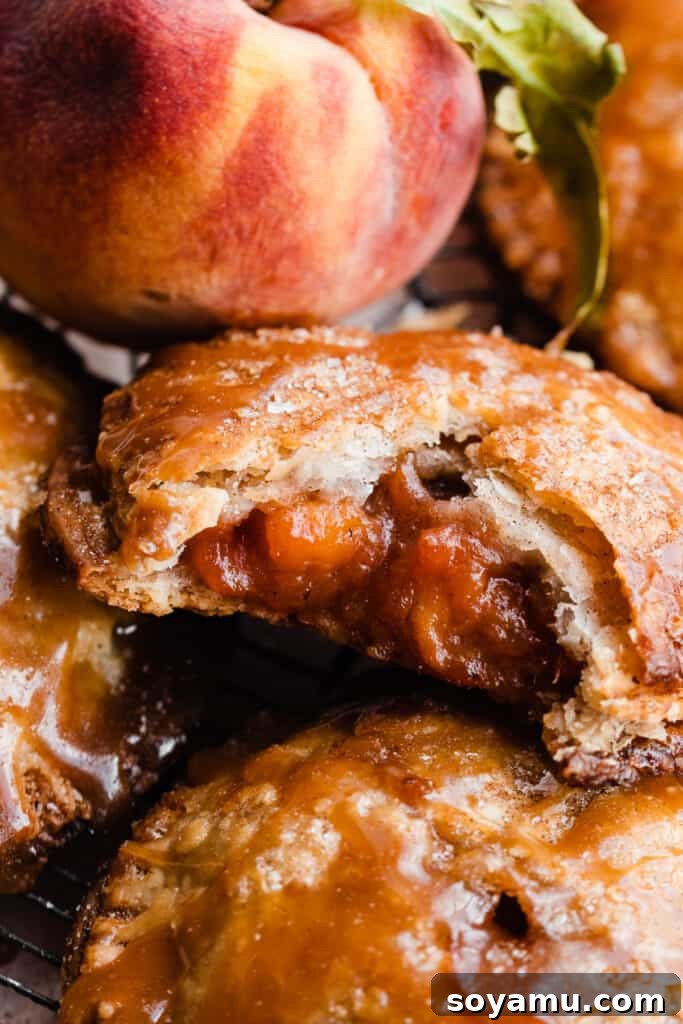
Step into summer with these incredibly delicious Salted Caramel Peach Hand Pies! Imagine a golden, buttery, and irresistibly flaky crust, generously filled with a sweet, homemade, cinnamon-spiced peach filling that bursts with juicy flavor in every bite. To crown this handheld marvel, a decadent drizzle of rich salted caramel sauce transforms it into a truly unforgettable dessert that will leave everyone craving more. Perfect for picnics, barbecues, or simply enjoying on a warm evening, these mini pies are a delightful way to celebrate peach season.

Why You’ll Fall in Love with These Peach Hand Pies
These Salted Caramel Peach Hand Pies aren’t just a dessert; they’re an experience. Here’s why they’ll become your new summer staple:
- Irresistibly Flaky Homemade Crust: While store-bought crusts offer convenience, nothing compares to the taste and texture of a freshly made, buttery, and flaky pie crust. Our recipe makes it surprisingly easy to achieve that golden, tender perfection that truly elevates these hand pies.
- Perfectly Portable Portions: Forget the fuss of slicing a whole pie! These mini hand pies are designed for convenience. They are individually sized, making them easy to serve, transport, and enjoy on the go. Ideal for potlucks, picnics, or a sweet treat after dinner without needing plates and forks.
- Bursting with Peach Perfection: Each hand pie is generously stuffed with a quick, homemade peach filling. Infused with warm cinnamon, hints of vanilla, and a touch of lemon to brighten the fresh peach flavor, every bite promises a juicy, sweet, and perfectly spiced experience.
- The Magic of Salted Caramel Drizzle: What truly sets these hand pies apart is the luscious salted caramel sauce. Its rich, buttery, and slightly salty notes perfectly complement the sweet peaches and flaky crust, adding a sophisticated layer of flavor that makes this dessert truly irresistible.

Essential Ingredients for Your Perfect Peach Hand Pies
Crafting these delectable hand pies requires a few key ingredients, each playing a vital role in the final flavor and texture. Here’s a detailed look at what you’ll need:
For the Flaky Pie Crust:
- All-Purpose Flour: The foundation of our crust. Proper measurement is crucial for the right texture; weighing your flour is highly recommended for consistency.
- Granulated Sugar: A small amount adds a subtle sweetness to the crust, balancing the rich butter and complementing the filling.
- Salt: Enhances all the flavors, preventing the crust from tasting bland. We use 3/4 tsp to ensure a well-seasoned dough.
- Cold Salted Butter: The secret to a truly flaky crust. Using cold butter, cut into small pieces, creates pockets of steam during baking, resulting in those desirable airy layers. Salted butter adds extra depth of flavor.
- Ice Cold Water: Essential for bringing the dough together without overworking it. The cold temperature helps keep the butter solid, contributing to flakiness.
For the Luscious Salted Caramel Sauce:
- Granulated Sugar: The base for creating that rich, amber caramel.
- Salted Butter, Cubed: Adds a creamy, buttery richness and a hint of saltiness that defines salted caramel. Cubing it helps it melt evenly.
- Heavy Cream: Transforms the cooked sugar and butter into a smooth, pourable sauce.
- Pinch of Flaky Sea Salt: A finishing touch that amplifies the caramel’s complexity and provides a delightful contrast to the sweetness.
For the Cinnamon-Spiced Peach Filling:
- Large Ripe Peaches, Diced: The star of the show! Fresh, ripe peaches offer the best flavor, but frozen diced peaches work wonderfully as well, making this recipe adaptable year-round.
- Light Brown Sugar, Packed: Contributes a deep, molasses-like sweetness that pairs beautifully with peaches and spices.
- Cinnamon & Nutmeg: These warm spices elevate the peach flavor, adding an aromatic depth that is quintessential in peach desserts.
- Vanilla Extract: A touch of vanilla enhances the overall sweetness and aroma of the filling.
- Lemon Juice: Brightens the peach flavor, prevents the peaches from browning excessively, and balances the sweetness.
- Corn Starch & Water (Slurry): A quick slurry ensures the peach filling thickens perfectly, preventing soggy bottoms in your hand pies and keeping the juicy filling intact.
For Baking & Finishing Touches:
- Large Egg (for sealing the dough): Used as an egg wash to seal the edges of the pies and create a beautiful golden-brown, shiny crust during baking.
- Coarse Sugar: Sprinkled on top before baking, it adds a lovely sparkle and a delightful textural crunch.
Optional Extras For Serving:
- Ice Cream, Whipped Cream, Flaky Sea Salt, or Cinnamon Sugar: These additions can further enhance the dessert experience, offering different textures and flavor combinations.
Smart Substitutions & Creative Variations
While this recipe is perfect as written, it’s also wonderfully adaptable. Feel free to customize these hand pies to suit your preferences or what you have on hand:
- Salted Caramel Sauce Alternatives: While homemade salted caramel sauce is highly recommended for its superior flavor and freshness (and it only takes 10 minutes!), you can certainly use a good quality store-bought caramel sauce in a pinch. Just be aware that many commercial options tend to be sweeter, so consider adding an extra pinch of flaky sea salt to balance it out.
- Pie Crust Shortcuts: If you’re short on time, store-bought pie crusts can be used. Look for brands known for their butter content for the best flavor. However, most bakers agree that homemade crust offers an unparalleled taste and flaky texture that’s truly worth the extra effort.
- Explore Other Fruit Fillings: Don’t limit yourself to peaches! These hand pies are incredibly versatile. Try using cherry pie filling for a tart and sweet treat, or apple pie filling for a classic comfort dessert. Mixed berries, rhubarb, or even a combination of fruits would also be delicious. Adjust spices as needed for your chosen fruit.
- Puff Pastry Magic: For a fun and even quicker alternative to homemade pie crust, use boxed puff pastry sheets. Simply thaw, roll slightly, cut into squares or circles, fill, and bake according to package directions or until golden brown. The flaky, airy layers of puff pastry offer a different, yet equally delightful, texture.
Master the Art of Peach Hand Pies: A Step-by-Step Guide
Making these hand pies is a rewarding baking project, and with our detailed instructions, you’ll achieve perfect results every time. Follow these steps for flaky crusts and juicy fillings:
Step 1: Crafting the Perfect Pie Dough
Begin by preparing the foundation of your hand pies: the buttery, flaky pie crust. Even if you’re new to making pie dough from scratch, this recipe is designed for success.
- In a large mixing bowl, whisk together the all-purpose flour, granulated sugar, and salt.
- Cut your very cold salted butter into tablespoon-sized chunks. Add these to the dry ingredients.
- Using a pastry cutter (a highly recommended tool for this task!), cut the butter into the flour mixture until the largest pieces are about the size of walnut halves, with smaller pieces interspersed throughout. Ensure all butter pieces are coated in flour.
- Gradually add the ice-cold water, 4 to 5 tablespoons at a time, mixing gently with a fork after each addition. Continue adding water until the dough just comes together and forms large, shaggy clumps. The dough should not feel sticky or overly wet but should hold together when you gently press a handful.
- Lightly form the dough into a rough ball, then divide it in half. Gently flatten each half into a 1-inch thick disc.
- Wrap each disc tightly in plastic wrap and chill in the refrigerator for at least 2 hours, or in the freezer for 1 hour. This crucial step allows the gluten to relax and the butter to firm up, ensuring a flaky crust.
- Make-Ahead Tip: Pie dough can be prepared up to 3 days in advance and stored in the fridge, or frozen for up to 2 months. Thaw frozen dough overnight in the refrigerator before use.
- Pie Crust Troubleshooting: For more in-depth information and tips on working with pie dough, including common issues and solutions, consider checking resources on perfect pie crust techniques.
Step 2: Preparing the Irresistible Salted Caramel Sauce
While your pie dough is chilling, take the opportunity to prepare your homemade salted caramel sauce.
- Follow the directions for your preferred homemade salted caramel sauce recipe. (A simple recipe typically involves heating sugar until caramelized, then whisking in butter and heavy cream, finishing with a pinch of salt).
- Make-Ahead Tip: Salted caramel sauce can be made up to 1 week in advance and stored in an airtight container in the refrigerator. Gently reheat before drizzling.
Step 3: Simmering Your Spiced Peach Filling
This sweet and spiced filling is the heart of your hand pies.
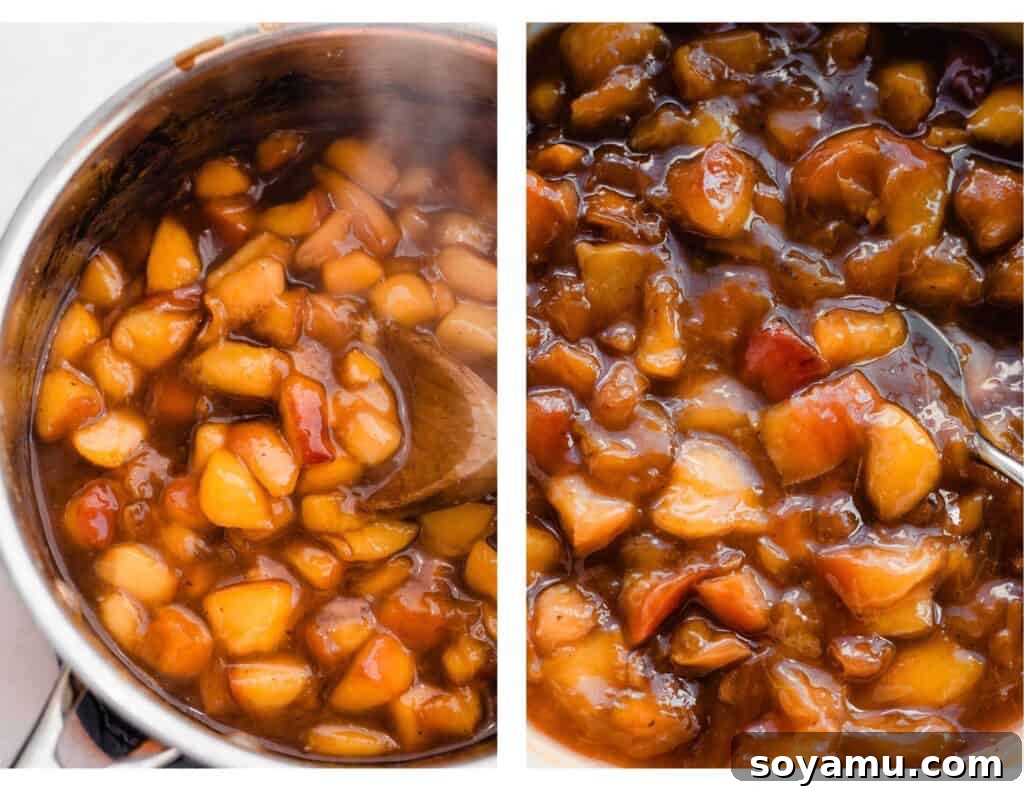
- In a medium saucepan, combine the diced peaches, light brown sugar, lemon juice, vanilla extract, cinnamon, and nutmeg. Place the saucepan over medium heat.
- Cook the mixture for about 6 minutes, stirring occasionally, until it becomes bubbly and the peaches start to soften.
- In a small separate bowl, whisk together the cornstarch and 2 teaspoons of water to create a slurry. Stir this slurry into the bubbling peach mixture.
- Continue to cook for another minute, stirring constantly, until the filling thickens. It should coat the back of a spoon.
- Immediately remove the saucepan from the heat and transfer the peach filling to a medium bowl. Allow it to cool completely in the refrigerator before using. This prevents the hot filling from melting your pie dough.
- Make-Ahead Tip: The peach filling can be made up to 3 days in advance and stored in an airtight container in the fridge.
Step 4: Rolling, Cutting & Assembling Your Hand Pies
Now comes the fun part – bringing your hand pies to life!
- Line a few baking sheets with parchment paper or silicone baking mats. Beat the large egg in a small bowl to create your egg wash. Preheat your oven to 375°F (190°C).
- Retrieve one disc of chilled pie dough from the fridge, leaving the other to stay cold. Working with one disc at a time helps maintain the dough’s temperature, especially if your kitchen is warm.
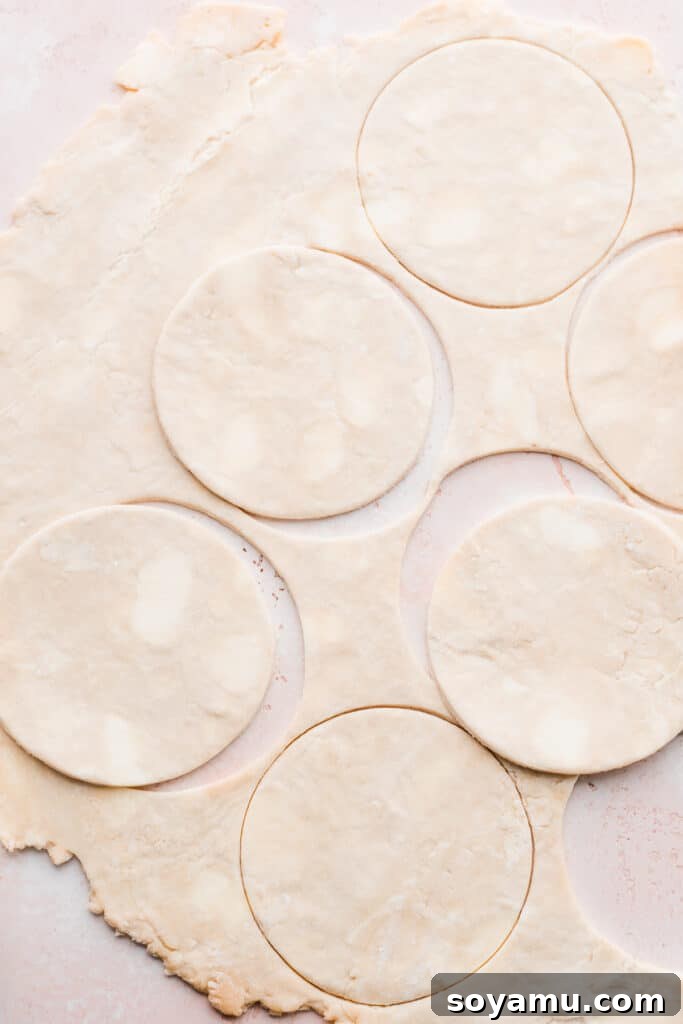
- Lightly flour your clean work surface and rolling pin. Roll out the dough disc, turning it occasionally, until it forms a roughly 14×14 inch square, about 1/8 inch thick. Consistency in thickness is key for even baking.
- Using a 4-inch round cutter (or a similarly sized bowl or glass), cut out as many circles as possible from the rolled dough.
- Gently gather any dough scraps, ball them up lightly, wrap them in plastic wrap, and return them to the refrigerator to chill. These scraps can be re-rolled once more.
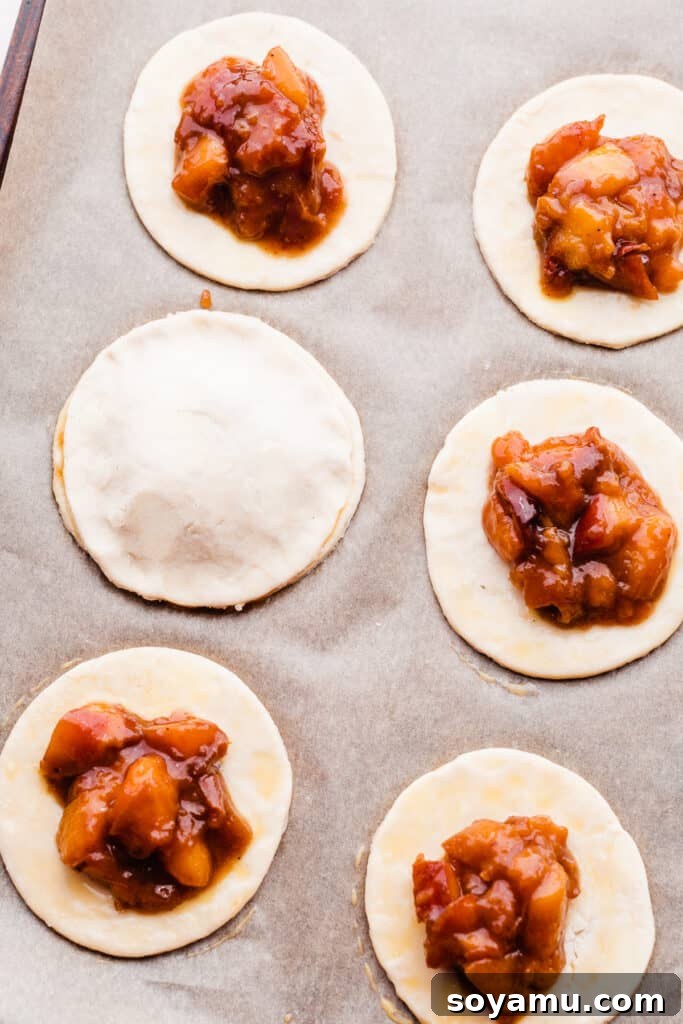
- Arrange half of the cut dough circles onto a prepared baking sheet. Spoon about two tablespoons of the cooled peach filling onto the center of each circle.
- Using a pastry brush, lightly brush the edges of each filling-topped dough circle with the beaten egg wash. This acts as a glue for sealing.
- Place another dough circle on top of each filled piece. Carefully press down around the edges with your fingertips to seal, ensuring no filling can escape. Then, use the tines of a fork to crimp the edges firmly, creating a decorative seal.
- Cut two or three small slits in the top of each hand pie with a sharp knife. These vents allow steam to escape during baking, preventing the pies from bursting.
- Place the baking sheet with the assembled hand pies into the refrigerator for about 10 minutes to re-chill the dough. This ensures the butter is very cold before hitting the hot oven, maximizing flakiness.
- While the first batch chills, repeat the rolling and assembly process with your second dough disc. After that, you can combine and re-roll the scraps from both discs once for a few more hand pies. Avoid re-rolling more than twice to prevent tough crusts.
Step 5: Achieving Golden Perfection in the Oven
Baking is where the magic happens, transforming your assembled dough into golden, flaky delights.
- Once your hand pies have re-chilled, remove the baking sheet from the refrigerator.
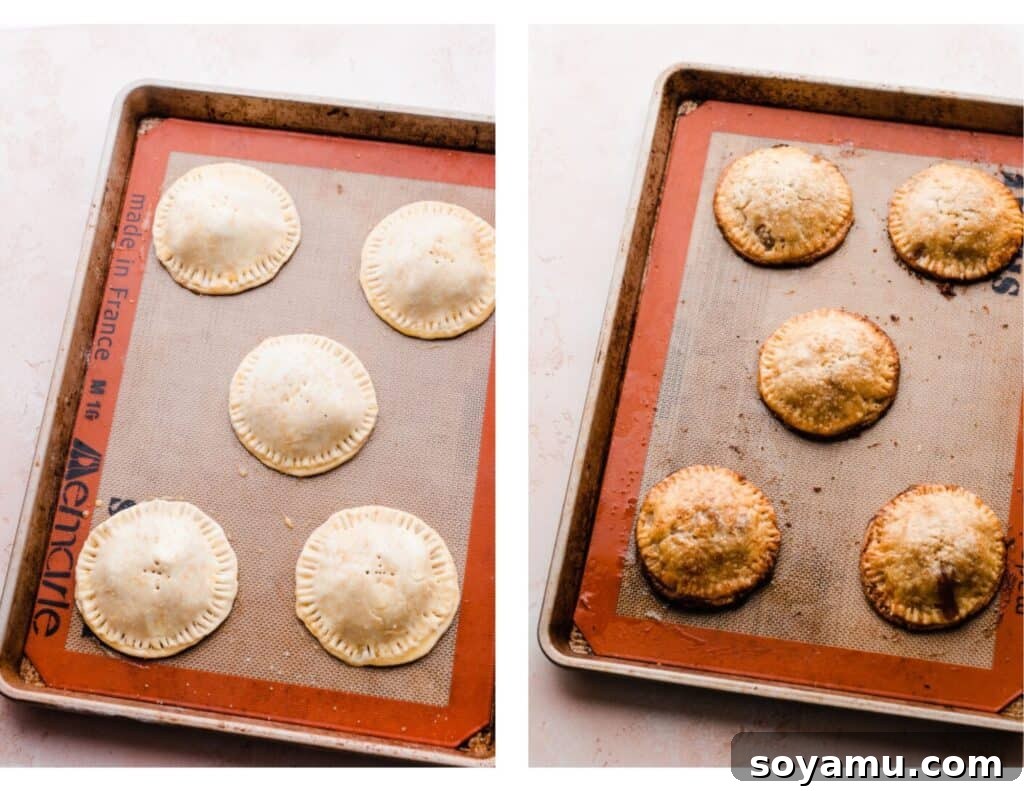
- Brush the top of each hand pie generously with the remaining egg wash. This promotes a beautiful golden-brown color and a slight sheen.
- Evenly sprinkle coarse sugar over the tops of the pies. For an extra layer of flavor, you could use cinnamon sugar here too.
- Bake the hand pies in the preheated oven for 26 to 31 minutes. Look for a deep golden-brown color on both the top and bottom crusts, indicating they are fully cooked and crisp.
- Once baked, transfer the baking sheet to a wire rack and let the hand pies cool for 5-10 minutes before drizzling with the salted caramel sauce. This allows them to set slightly.
Step 6: The Grand Finale: Drizzle & Serve!
The final touch that makes these hand pies truly extraordinary.
Drizzle the warm, baked peach hand pies generously with your homemade (or store-bought) salted caramel sauce. Serve them immediately while they are still warm from the oven for the best experience. For an extra touch of indulgence, consider adding a scoop of vanilla ice cream, a dollop of fresh whipped cream, or a light sprinkle of flaky sea salt or cinnamon sugar. The combination of warm fruit, flaky crust, and sweet-salty caramel is pure bliss.
Serving Suggestions & Storage Tips
These portable treats are perfect for any occasion, and knowing how to serve and store them will ensure maximum enjoyment.
Serving:
- Warm with Caramel: The classic way to enjoy them! A generous drizzle of salted caramel sauce while they’re still warm enhances all the flavors.
- A La Mode: Serve with a scoop of vanilla bean ice cream or a dollop of homemade whipped cream for a luxurious touch.
- Added Texture: A sprinkle of flaky sea salt or a dusting of cinnamon sugar on top adds an extra layer of flavor and texture.
- Breakfast or Brunch Treat: While decadent, these hand pies also make a wonderful addition to a special breakfast or brunch spread.
Storing:
- Room Temperature (Short Term): Once completely cooled, you can store these mini peach hand pies in an airtight container at room temperature for up to 1 day. However, the crust will begin to lose its crispness.
- Refrigerator (Best for Leftovers): For longer storage and to maintain some crispness, store leftovers in an airtight container in the fridge for 2-3 days. Reheat gently in the microwave for a few seconds or in a 350°F (175°C) oven for 8-15 minutes until warmed through and the crust regains some crispness.
- Freezing Unbaked Hand Pies: Hand pies can be fully assembled (but without egg wash or coarse sugar on top) and frozen. Arrange them in a single layer on a parchment-lined baking sheet until solid, then transfer to a freezer-safe container or bag with parchment paper between layers. Freeze for up to 2 months. Bake from frozen, adding egg wash and coarse sugar as directed in the recipe. Baking time will be approximately the same.
- Freezing Baked Hand Pies: Let baked pies cool completely. Freeze them in the same manner as unbaked pies. To reheat, warm in a 350°F (175°C) oven for 8-15 minutes, or until heated through and no longer frozen in the center.
Can’t get enough of peach season? Make my Peach Cobbler Pound Cake or my Peach Cobbler Cookies next!
Expert Tips for Hand Pie Success
Achieving bakery-quality hand pies is easier than you think with these professional tips:
- The Golden Rule: Keep Everything Cold! This is arguably the most important tip for perfect pie dough. Ensure your butter is ice-cold and your water is ice-cold. If your kitchen is warm, you can even use a bowl of ice water to keep your hands cool while working with the dough. The contrast between the cold butter in the dough and the hot oven creates steam, which is what gives pie crust its signature flaky layers. Don’t skip the chilling steps!
- Homemade Salted Caramel Sauce: While shortcuts are available, taking the extra 10 minutes to make your own salted caramel sauce is truly worth it. The fresh, rich flavor and perfect balance of sweet and salty are unmatched by store-bought versions. Once you see how simple it is, you’ll be making it all the time!
- Oven Accuracy Matters: An oven thermometer is an inexpensive tool that can drastically improve your baking results. Ovens often run hotter or colder than the temperature they are set to. Accurate oven temperature is crucial for consistent baking, ensuring your crusts brown evenly and your filling cooks perfectly. Keep an oven thermometer inside at all times to monitor your oven’s calibration.
- Precision with a Food Scale: For consistent and professional baking results, a kitchen scale is invaluable, especially for measuring flour. The weight of flour can vary significantly depending on how it’s scooped (e.g., spooned and leveled versus scooped directly from the bag), and measuring cups are not always standardized. Weighing ingredients ensures you use the precise amounts every time, leading to more reliable outcomes.
Frequently Asked Questions (FAQs)
Yes, this recipe is quite flexible and can be easily halved or doubled. If you plan to double the pie dough, it’s highly recommended to make it in two separate batches. This helps reduce the risk of overworking the dough, which can lead to a tough crust, and ensures the butter remains cold throughout the process.
Absolutely! These hand pies freeze beautifully, both baked and unbaked. To freeze unbaked pies: prepare them through the assembly stage, but do not apply the egg wash or coarse sugar. Freeze them in a single layer on a parchment paper-lined baking sheet until solid. Once frozen, transfer them to a freezer-safe airtight container or bag, placing parchment or wax paper between layers to prevent sticking. When ready to bake, add the egg wash and coarse sugar and bake directly from frozen; the bake time will be roughly the same, possibly a few minutes longer. To freeze baked pies: allow them to cool completely, then freeze them in the same manner. To reheat, warm them in a 350°F (175°C) oven for 8-15 minutes, or until heated through and no longer frozen.
Yes, you can absolutely use frozen diced peaches for the filling. There’s no need to thaw them beforehand. Simply add the frozen peaches directly to the saucepan with the other filling ingredients and proceed with the recipe as written. You might need to cook them for a minute or two longer to ensure they are fully softened and release their juices, but the result will be just as delicious.
Several factors contribute to a soggy bottom crust. First, ensure your peach filling is completely cooled before assembling the pies. Hot filling can melt the butter in the dough, leading to sogginess. Second, make sure the filling is properly thickened with cornstarch; a runny filling will make the crust wet. Third, bake the pies at the correct temperature (375°F/190°C) until the crust is deeply golden brown on both top and bottom. A dark golden color indicates a fully cooked and crisp crust. Finally, once baked, cool the pies on a wire rack to allow air circulation, which prevents moisture from accumulating underneath.

Recommended Tools for Effortless Baking
Having the right tools can make all the difference in your baking experience, especially when working with pie dough. Here are some essentials that will help you achieve perfect peach hand pies:
- Pastry Cutter: This simple yet invaluable tool makes incorporating cold butter into flour incredibly easy and efficient. It helps create the perfect pea-sized butter pieces without overworking the dough with your warm hands, which is crucial for a flaky crust. They are inexpensive and widely available.
- Pastry Brush: A pastry brush is essential for evenly applying egg wash to the tops and edges of your hand pies, ensuring a beautiful golden-brown finish and a secure seal. It’s also useful for other baking tasks like brushing melted butter or glazes.
- Round Cutters (or Biscuit Cutters): To achieve uniformly shaped hand pies, a set of round cutters is ideal. A 4-inch cutter works well for these individual treats. A good set of round cutters is a versatile investment, useful for not just pies but also biscuits, cookies, and even donuts.
- Rolling Pin: A reliable rolling pin is necessary for rolling out your pie dough to an even thickness. Whether you prefer a classic French rolling pin or one with handles, choose one that feels comfortable and allows you to apply even pressure for a consistent crust.
- Baking Sheets & Parchment Paper/Silicone Mats: Having several baking sheets lined with parchment paper or silicone baking mats ensures your hand pies bake evenly and don’t stick. This also makes cleanup a breeze!

Discover More Irresistible Pie Recipes
If you loved these Peach Hand Pies, you’re sure to enjoy these other fantastic pie recipes from our collection:
- Strawberry Blueberry Pie
- Brûléed Maple Pie
- Bourbon Cherry Pie with Crumble Topping
- Strawberry Rhubarb Hand Pies
- Dutch Caramel Apple Pie
Did you make this recipe? We’d love to hear from you!
Share your experience and leave a comment and star rating below, letting us know how you liked the recipe. Your feedback is incredibly valuable and helps our small business immensely!
Salted Caramel Peach Hand Pies Recipe

Salted Caramel Peach Hand Pies
By Stephanie Simmons
Salted Caramel Peach Hand Pies are the perfect summer dessert! Buttery, flaky crust is filled with an easy homemade cinnamon-spiced peach pie filling, and topped with salted caramel sauce for an irresistible dessert everyone is sure to love.
Prep Time: 1 hour
Cook Time: 31 minutes
Servings: 12 pies
Average Rating: 5 out of 5 stars (based on 10 votes)
Pin Recipe | Print Recipe
Ingredients
For the Pie Crust
- 3 cups all-purpose flour, spooned & leveled or weighed out (390 grams)
- 2 tbsp granulated sugar (26 grams)
- 3/4 tsp salt
- 1 cup + 2 tbsp salted butter, cold (18 tbsp, or 254 grams)
- 10-15 tbsp ice cold water
For the Salted Caramel Sauce:
- 1 cup granulated sugar (210 grams)
- 6 tbsp salted butter, cubed (85 grams)
- 1/2 cup + 1 tbsp heavy cream (135 grams)
- Pinch of flaky sea salt
For the Peach Filling
- 4 large ripe peaches, diced (Fresh or frozen both work, about 4 cups, 25 ounces, or 650 grams)
- 2/3 cup light brown sugar, packed (147 grams)
- 3/4 tsp cinnamon
- 1/4 tsp nutmeg
- 1/2 tsp vanilla extract
- 1 tsp lemon juice
- 2 tsp corn starch
- 2 tsp water
For Baking:
- 1 large egg, for sealing the dough
- Coarse sugar, for topping the pies
Optional Extras For Serving:
- Ice cream, whipped cream, flaky sea salt, or cinnamon sugar
You are viewing this recipe in US Customary units. Convert to Metric
Instructions
-
Make the Pie Dough: Whisk together the flour, salt, and sugar in a large mixing bowl. Cut the cold butter into tablespoon-size chunks. Cut the butter into the flour with a pastry cutter until you have pieces the size of walnut halves and smaller, coated in flour. Add the ice cold water, 4-5 tablespoons at a time, stirring with a fork after each addition. Stop adding water when the dough comes together easily and begins to form large clumps. The dough shouldn’t feel sticky or overly wet, but should hold together when you try to form it into a ball. Form the dough into a rough ball, then slice it in half. Gently flatten each half into a 1″ thick disc. Wrap tightly in plastic wrap, and chill for at least 2 hours in the fridge, or 1 hour in the freezer.
Make-Ahead Tip: Pie dough can be made up to 3 days ahead and kept in the fridge, or it can be stored in the freezer for up to 2 months. Thaw it in the fridge overnight before using.
Pie-Crust Troubleshooting: Visit our section on expert tips for lots of in-depth information and troubleshooting on pie dough! -
Make the Salted Caramel Sauce: Prepare the salted caramel sauce as directed in our dedicated homemade caramel sauce recipe while your dough is chilling.
Make-Ahead Tip: This can be made up to 1 week ahead and stored in the fridge. -
Make the Peach Filling: Add diced peaches, light brown sugar, lemon juice, vanilla, cinnamon, and nutmeg to a medium saucepan over medium heat. Cook for 6 minutes, until bubbly. Stir the corn starch and water together in a small bowl and add to the peach mixture. Cook for 1 minute, then remove from the heat immediately and transfer to a medium bowl to cool completely in the fridge.
Make-Ahead Tip: This can be made up to 3 days ahead and stored in an airtight container in the fridge. - Roll Out Pie Dough & Assemble your Hand Pies: Line a few baking sheets with parchment paper or silicone baking mats. Beat the egg in a small bowl for the egg wash. Preheat your oven to 375°F (190°C). Start with one dough disc, keeping the other cold in the fridge. Lightly flour your counter and begin rolling out the dough disc, turning it as you go, until it’s about 14″ x 14″ and 1/8″ thick. Use a 4″ round cutter (or a bowl/glass of the same size) to cut circles out of the dough. Gently ball up your scraps, wrap them, and re-chill before re-rolling. Arrange half of the circles on a baking sheet. Spoon two tablespoons of peach filling onto each circle. Use a pastry brush to brush the edges of each circle with the beaten egg, then press another dough circle on top of each filled piece. Press the edges with your fingertip to seal, then crimp with the tines of a fork. Cut small slits in the top to vent each pie. Pop the baking sheet in the fridge to chill for about 10 minutes. While this pan bakes, repeat the process with your next dough disc. Then, re-roll the scraps from the first and second discs, combining them for a final roll out (expect about 2 more circles).
- Bake: Once the hand pies have re-chilled, brush the top of each hand pie with egg wash, and sprinkle with coarse sugar (or cinnamon sugar). Bake for 26 to 31 minutes, until the crusts are deeply golden brown and crisp on top and bottom. Let the baking sheet cool on a wire rack for 5-10 minutes before drizzling with salted caramel sauce.
- Serve + Store: Serve while nice and warm from the oven, with salted caramel sauce! Optionally add flaky sea salt, cinnamon sugar, whipped cream, or vanilla ice cream. These are best on the first 1-2 days. Store leftovers in an airtight container in the fridge; if left at room temperature overnight, the dough will lose its crisp texture. Gently reheat leftovers in the microwave or oven.
- Make-Ahead Tip: Hand pies can be fully assembled (without egg wash on top) and frozen. Freeze them on a baking sheet first so they don’t stick, then transfer to an airtight container or freezer bags for up to 2 months. Bake from frozen, following the rest of the recipe as directed.
Notes
- Dough Scraps: With the remaining dough scraps after cutting your last circles, don’t re-roll them again to avoid toughness. Instead, slice them into abstract shapes of similar size to bake as pie crust chips. Pop them on a lined baking sheet, brush with egg wash, and sprinkle with cinnamon sugar. Bake for 12-20 minutes, or just until golden brown and crisp.
- Canned Filling Option: In a pinch, you can use a 21-ounce can of peach pie filling instead of making the fresh peach filling from scratch. This is a great time-saver!
Nutrition Information
Serving: 1 pie,
Calories: 233 kcal,
Carbohydrates: 54g,
Protein: 3g,
Fat: 0.4g,
Saturated Fat: 0.1g,
Polyunsaturated Fat: 0.1g,
Monounsaturated Fat: 0.03g,
Sodium: 148mg,
Potassium: 43mg,
Fiber: 1g,
Sugar: 30g,
Vitamin A: 0.4IU,
Vitamin C: 0.2mg,
Calcium: 11mg,
Iron: 2mg
Nutrition information is automatically calculated and should only be used as an approximation.
Like this recipe? We’d love your feedback!
If you enjoyed making and tasting these delicious hand pies, please consider leaving a comment and a star rating on the recipe card above. Your thoughts and ratings are incredibly helpful and appreciated!