
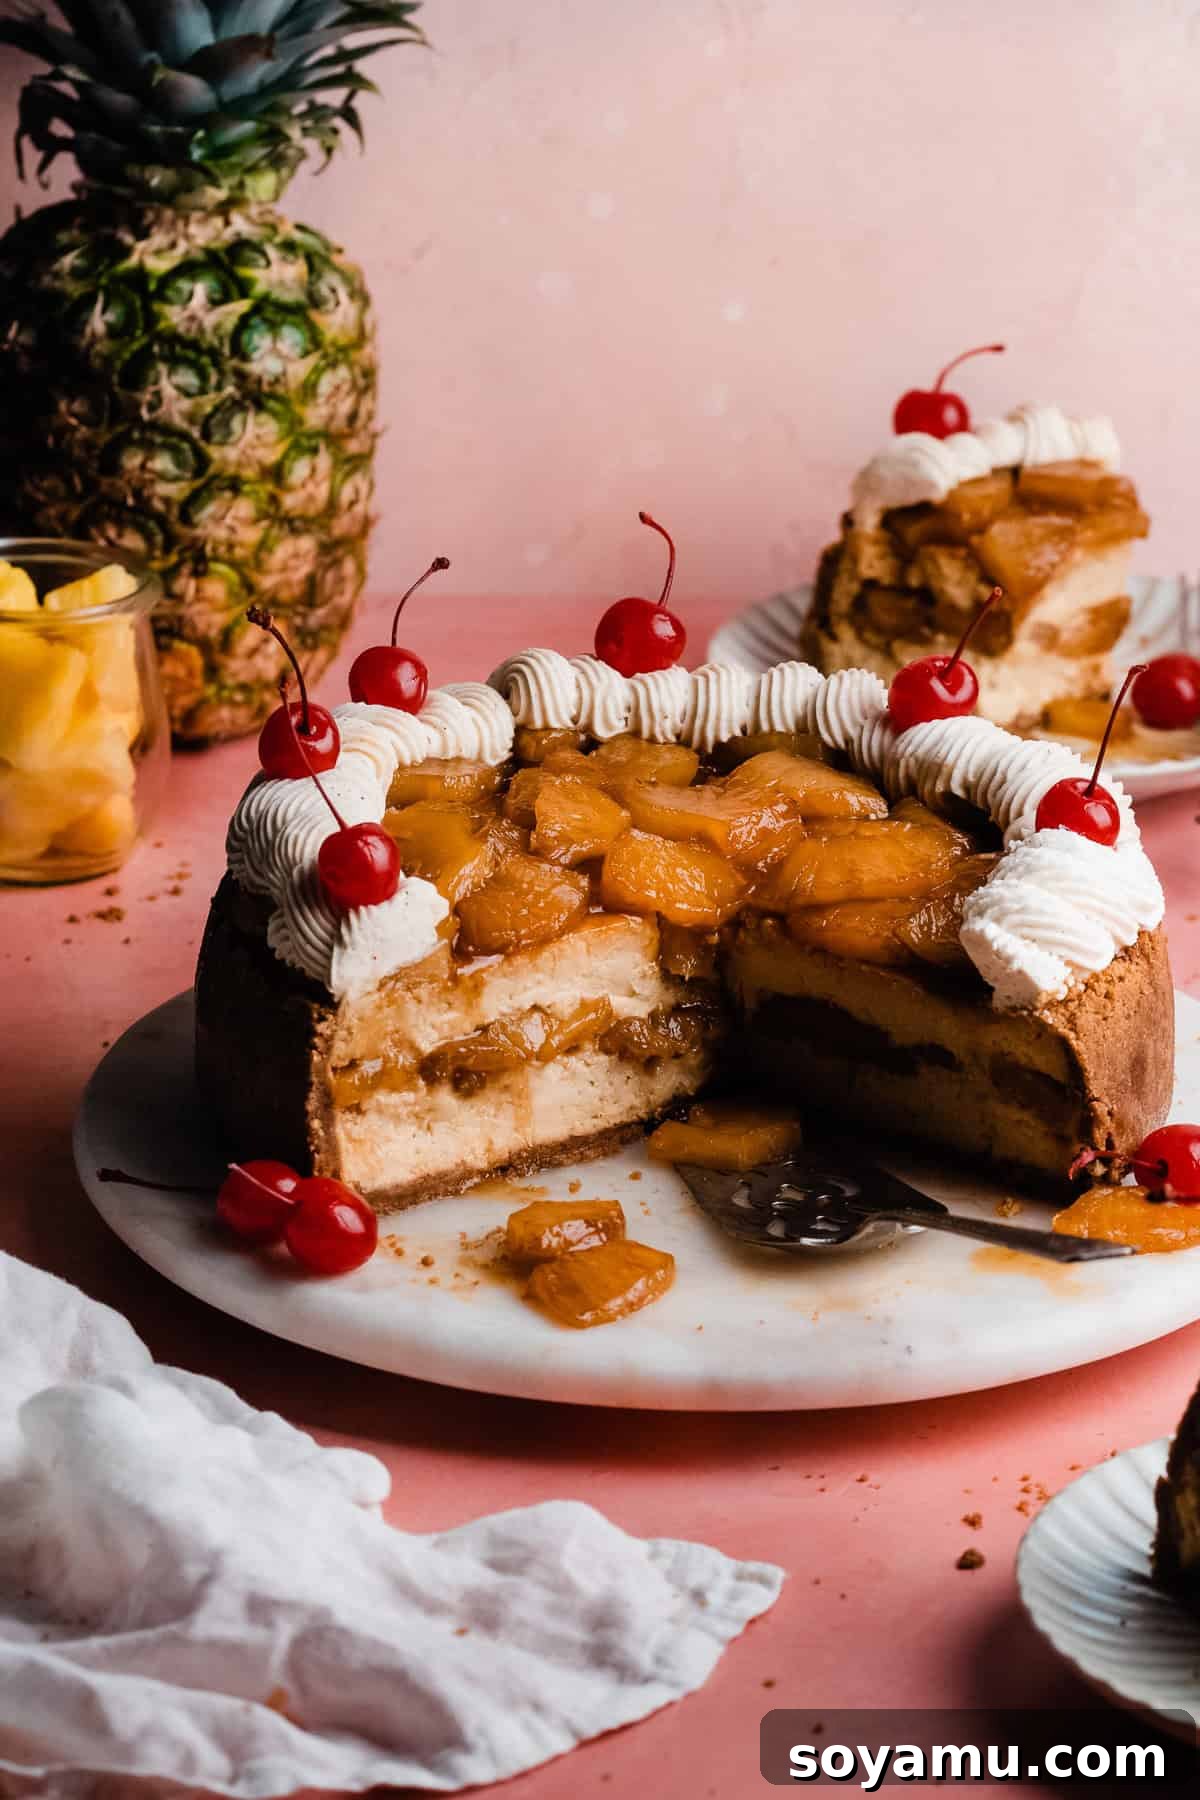
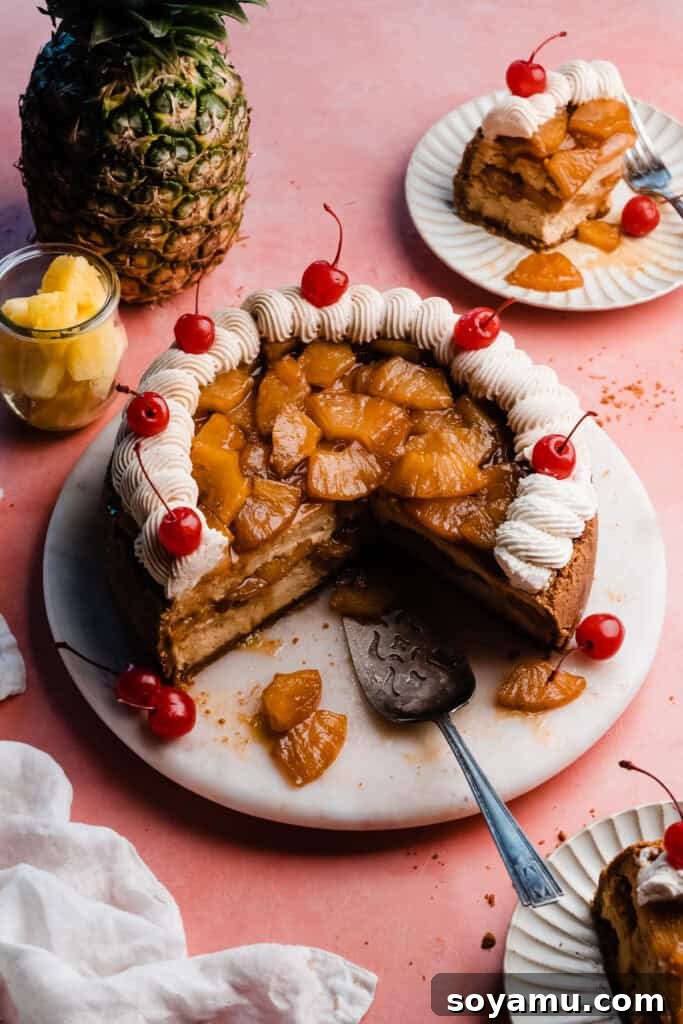
Indulge in a truly extraordinary dessert experience with this **Pineapple Upside Down Cheesecake**, a delightful fusion that captures the beloved flavors of a classic pineapple upside-down cake within the rich, creamy embrace of a cheesecake. This stunning dessert begins with an ultra-creamy brown sugar cheesecake base, perfectly baked on a crisp, buttery graham cracker crust. What truly sets it apart is the generous layer of luscious caramelized pineapple filling nestled within, and an even more abundant topping of the same golden, sweet pineapple. Finished with elegant swirls of vanilla whipped cream and vibrant maraschino cherries, this cheesecake isn’t just a treat for the palate—it’s a feast for the eyes, promising a memorable dessert for any gathering or special occasion.
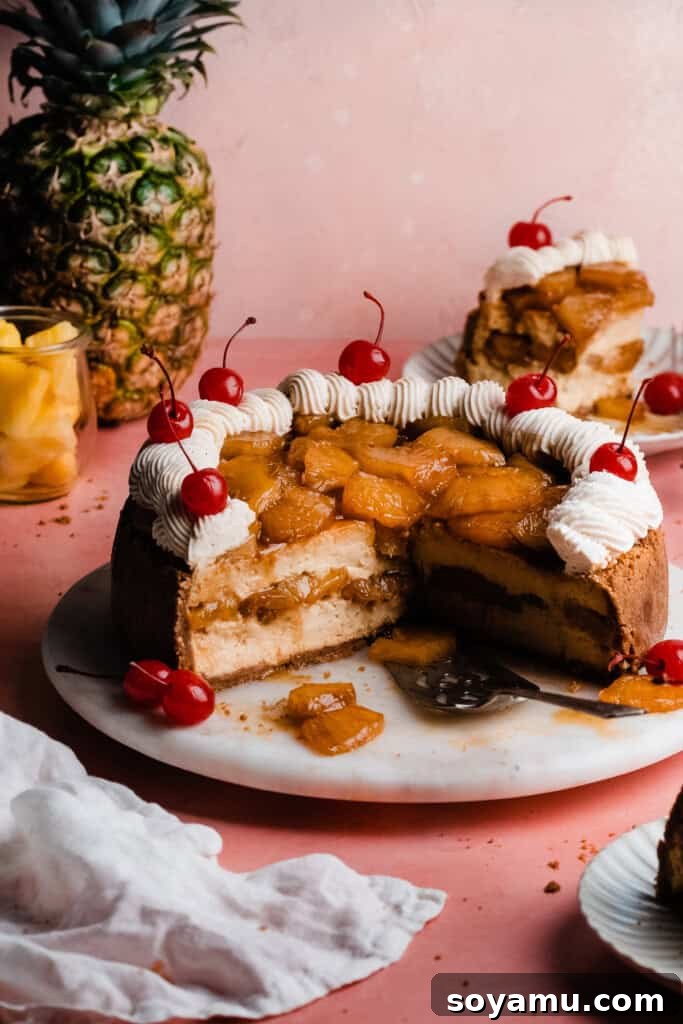
The concept of marrying the tropical sweetness of pineapple upside-down cake with the decadent texture of cheesecake has charmed dessert lovers worldwide, famously popularized by establishments like Cheesecake Factory. However, this homemade recipe simplifies the process, delivering all the incredible flavor without the complexity of baking two separate desserts. We’ve expertly integrated the distinct, comforting taste of a pineapple upside-down cake directly into a single, magnificent cheesecake. This innovative approach makes it not only easier to prepare but also guarantees a show-stopping result that will undoubtedly become a cherished favorite for your family and guests. Whether it’s a holiday, a birthday, or simply a desire for something extraordinary, this cheesecake rises to the occasion.
**Why You’ll Adore This Pineapple Upside Down Cheesecake:**
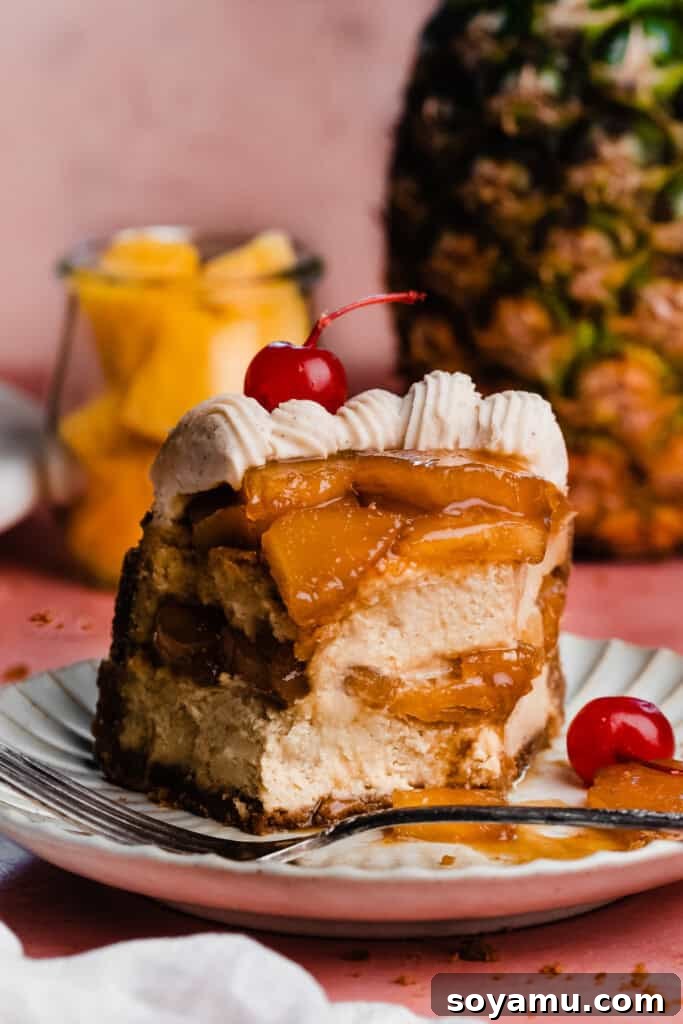
- **Unforgettably Creamy Pineapple Cheesecake:** Our cheesecake base is designed for ultimate silkiness. Crafted with a blend of rich ingredients and baked to perfection, it achieves a luscious, melt-in-your-mouth consistency. The brown sugar infusion brings a depth of caramel-like flavor that perfectly complements the pineapple, creating a harmonious and truly indulgent experience that is both simple to prepare and quick to come together.
- **Abundant Pineapple Filling & Topping:** This recipe doesn’t just hint at pineapple; it celebrates it! The cheesecake is generously filled with a layer of juicy, caramelized pineapple chunks, ensuring a burst of tropical sweetness with every bite. The top is then adorned with even more of this exquisite compote, creating a beautiful visual and a delightful textural contrast that enhances the overall flavor profile.
- **Perfectly Crisp Graham Cracker Crust:** A truly great cheesecake starts with a stellar crust. Ours features a perfectly baked graham cracker base that is both buttery and wonderfully crisp. It provides the ideal foundation, offering a satisfying crunch that contrasts beautifully with the smooth cheesecake and soft pineapple layers, creating a balanced and thoroughly enjoyable dessert from top to bottom.
- **Classic Whipped Cream & Cherry Embellishments:** No pineapple upside-down inspired dessert would be complete without its signature garnishes. This cheesecake is crowned with elegant swirls of homemade vanilla whipped cream, adding a light, airy contrast to the rich cheesecake. Each slice is then finished with bright maraschino cherries, replicating the iconic look and taste of a traditional pineapple upside-down cake.
**Essential Ingredients for Your Cheesecake:**
Crafting this extraordinary Pineapple Upside Down Cheesecake requires a selection of high-quality ingredients, each playing a crucial role in achieving the perfect flavor and texture. For detailed measurements and step-by-step instructions, please refer to the comprehensive recipe card located further down this page.
- **Cream Cheese:** The foundation of any great cheesecake! Always opt for full-fat cream cheese in block form. It’s imperative that your cream cheese is at room temperature before mixing. This ensures a smooth, lump-free batter, which is key to achieving that signature creamy cheesecake texture. Cold cream cheese will result in a lumpy batter that won’t bake evenly.
- **Brown Sugar:** This ingredient is vital for imparting that classic “upside-down cake” flavor. Dark brown sugar is highly recommended for its deeper, richer molasses notes, which caramelize beautifully with the pineapple. However, light brown sugar can also be used. In a pinch, granulated sugar will work, but brown sugar truly enhances the tropical, caramelized profile we’re aiming for.
- **Eggs:** Large eggs, also at room temperature, are essential for binding the cheesecake batter and providing structure. Room temperature eggs emulsify more effectively with the other ingredients, leading to a smoother, more homogenous batter and a perfectly set cheesecake.
- **Sour Cream:** Full-fat sour cream, brought to room temperature, adds a crucial tang and richness to the cheesecake, contributing to its ultra-creamy texture. It also helps to balance the sweetness and provides a subtle acidity that brightens the overall flavor. Plain full-fat Greek yogurt can be a suitable alternative if sour cream is unavailable.
- **Vanilla Extract:** Use pure, high-quality vanilla extract. It enhances all the other flavors, adding a warm, aromatic note that is indispensable in both the cheesecake batter and the pineapple filling.
- **Pineapple:** While fresh pineapple offers an exquisite taste, canned pineapple rings prove to be incredibly convenient for this recipe. Using canned rings means less prep time and consistent ripeness, eliminating the wait for fresh pineapples to mature. If you opt for fresh, ensure it’s ripe: it should be firm but not rock-hard, have a pleasant pineapple aroma at its base, and leaves should pluck easily. Fresh pineapple is also fantastic for my Grilled Pineapple recipe!
- **Graham Cracker Crumbs:** For the crust, pre-made graham cracker crumbs offer a convenient shortcut. If you prefer to make your own, simply pulse whole graham crackers in a food processor until fine crumbs form. Note that homemade crumbs might require an additional 1-2 tablespoons of melted butter to achieve the perfect consistency for pressing into the pan. If graham crackers aren’t available in your region, digestive biscuits make an excellent comparable substitute, offering a similar buttery, crumbly texture.
**Creative Recipe Adaptations & Variations:**
This Pineapple Upside Down Cheesecake recipe is wonderfully adaptable, allowing for various substitutions and creative twists to suit different dietary needs or adventurous palates.
- **Gluten-Free Option:** Making this cheesecake gluten-free is simple! Just substitute traditional graham cracker crumbs with a high-quality brand of gluten-free graham crackers. Ensure all other ingredients are naturally gluten-free, and you’ll have a delicious dessert safe for those with gluten sensitivities.
- **Dairy-Free Exploration:** While this specific recipe hasn’t been tested with dairy-free alternatives, it’s certainly possible to explore! Look for reputable vegan baking blogs such as The Banana Diaries or Little Blog of Vegan for guidance on using dairy-free cream cheese, sour cream, and heavy cream substitutes. Success often depends on the specific brands and formulations of these plant-based ingredients.
- **Graham Cracker Alternatives:** If you’re outside the U.S. and graham crackers are hard to find, digestive biscuits are an excellent, readily available substitute. They offer a similar texture and mild flavor that complements the cheesecake perfectly.
- **Sour Cream Substitutes:** For an equally creamy texture and tangy flavor, you can confidently replace sour cream with full-fat plain Greek yogurt or even heavy cream. Both options will contribute to the cheesecake’s luxurious consistency.
- **Time-Saving Tip:** If you’re short on time, you can streamline the process by making only half the caramelized pineapple filling. Use this smaller batch exclusively as a topping after the cheesecake has baked and chilled, still delivering fantastic flavor with fewer steps.
- **Piña Colada Cheesecake Twist:** Elevate this dessert to an adults-only treat by transforming it into a Piña Colada Cheesecake! Incorporate 2-4 tablespoons of coconut rum or vanilla rum into the cheesecake batter (add it along with the sour cream and vanilla extract). For an extra kick, stir 1-3 tablespoons of rum into the pineapple filling after it has fully cooked and cooled. This tropical, boozy variation is perfect for summer parties or a sophisticated evening indulgence.
- **Cool Whip Convenience:** If preparing homemade whipped cream isn’t feasible, a store-bought whipped topping like Cool Whip can be a convenient and delicious alternative for garnish. Just dollop it on top before serving for a quick finish.
- **Smaller Cheesecake Option:** For a more modest dessert or a smaller gathering, halve the entire recipe. Bake the reduced batter in a pre-made 9-inch graham cracker crust (found in most grocery store baking aisles), omitting the pineapple layer in the center. Once baked and chilled, top this smaller cheesecake with about a third of the pineapple filling. This yields an easy, delightful dessert without the full commitment.
**Step-by-Step Guide: Crafting Your Pineapple Upside Down Cheesecake:**
Creating this magnificent cheesecake is a rewarding baking project. Follow these detailed steps for a flawless result.
**Step 1: Prepare the Caramelized Pineapple Filling & Topping.**
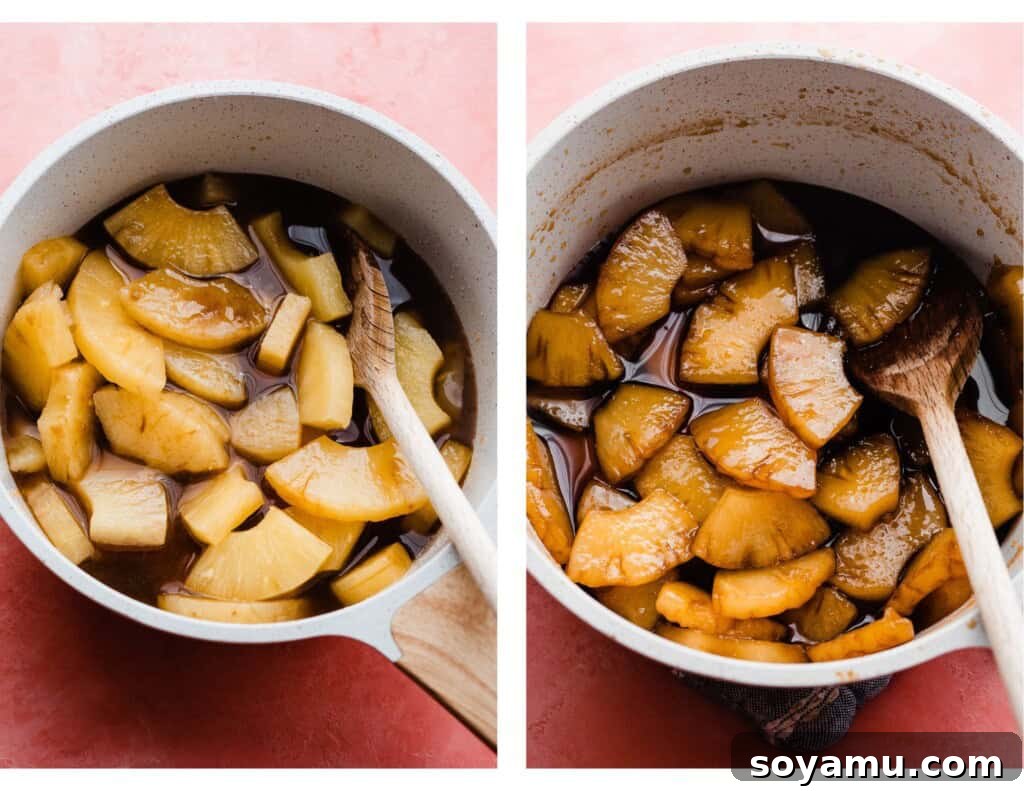
Begin by combining pineapple chunks, brown sugar, and pineapple juice in a large saucepan. Cook this mixture over high heat, initially with a lid to accelerate the process, for 18-25 minutes. Stir occasionally, allowing the juices to reduce significantly and the pineapple to caramelize beautifully. You’ll notice the liquid transforming into a rich, almost syrupy consistency.
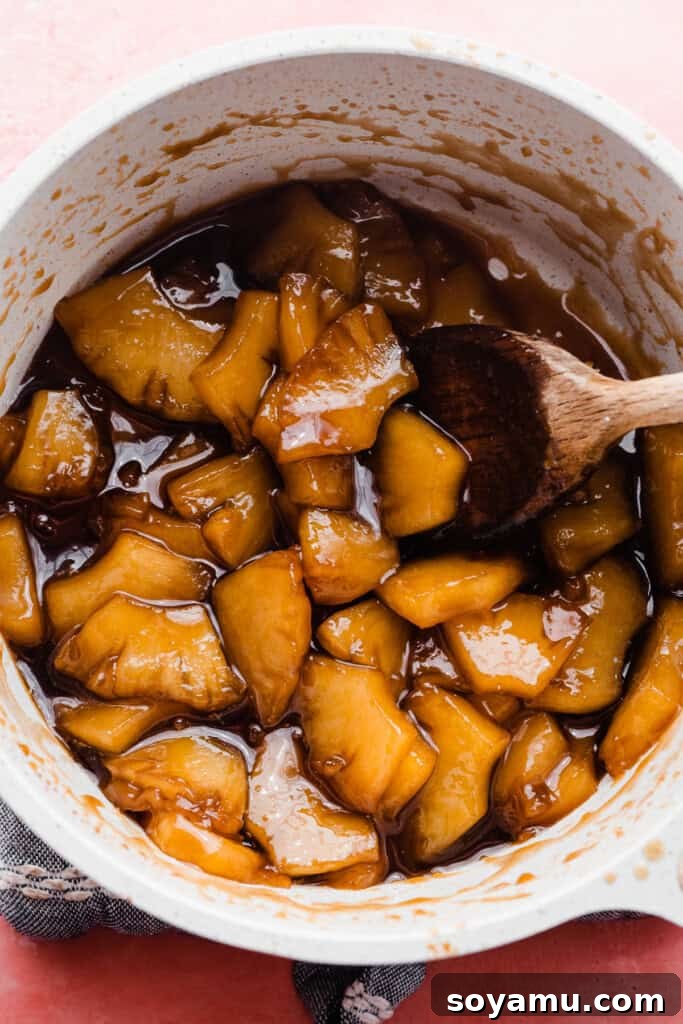
Once the liquid is sufficiently reduced, reduce the heat to medium-high. Prepare a cornstarch slurry by dissolving cornstarch in water in a small bowl, then stir it into the pineapple mixture. Continue to cook for another 1-2 minutes, stirring constantly, until the filling visibly thickens enough to coat the back of a spoon—a trail drawn with your finger should hold its shape. Remove from heat, stir in vanilla extract (and rum, if using), then immediately transfer the filling to a large rimmed baking sheet. Spreading it out allows it to cool rapidly in the refrigerator, which is crucial before incorporating it into the cheesecake. This filling can be made 2-3 days in advance and stored in an airtight container in the fridge.
**Step 2: Construct the Buttery Graham Cracker Crust.**
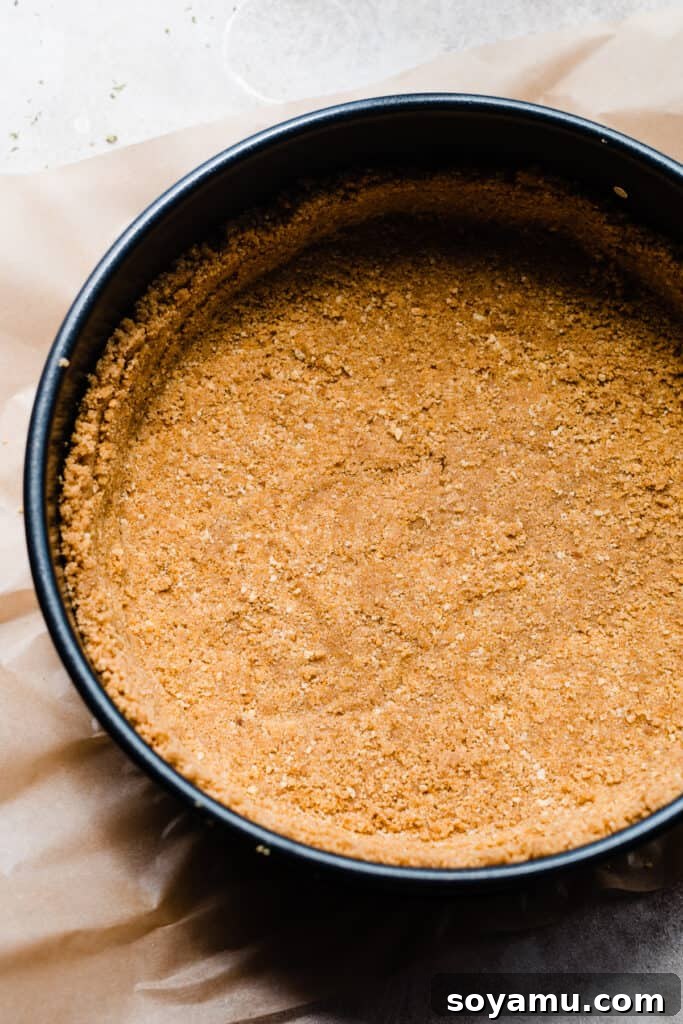
Preheat your oven to 350°F (175°C). Lightly spray a 9-inch springform pan with nonstick spray, then line the bottom with a piece of parchment paper and securely fasten the springform pan. Spray the interior sides of the pan as well. In a bowl, combine graham cracker crumbs with melted butter, mixing until thoroughly moistened. Press this mixture firmly into the bottom and slightly up the sides of the prepared springform pan. Bake for 10 minutes to set the crust. Keep the oven on, and start a large pot of water boiling for your water bath.
**Step 3: Prepare the Silky Cheesecake Batter.**
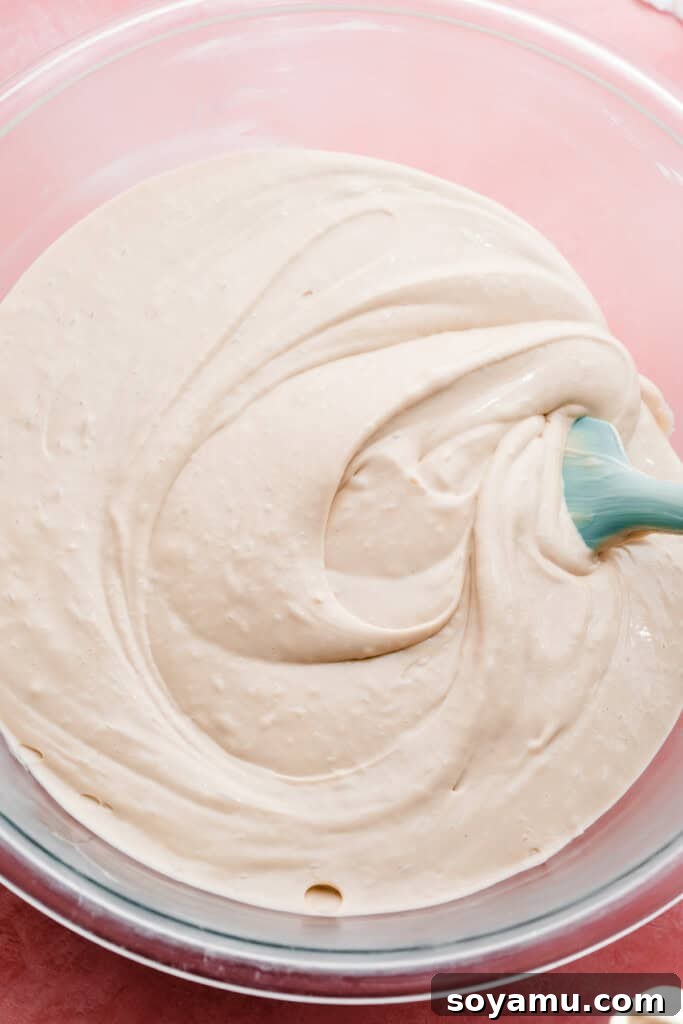
Ensure all cold ingredients have reached room temperature. In a large mixing bowl (or the bowl of a stand mixer fitted with the paddle attachment), beat the softened cream cheese on high speed until perfectly creamy, about 1-2 minutes. Gradually add the brown sugar, continuing to beat on high for another 1-2 minutes until fully incorporated. Remember to scrape down the sides and bottom of the bowl frequently with a rubber spatula to eliminate any hidden lumps of cream cheese. Incorporate the eggs one at a time, mixing on medium speed just until each is combined. Finally, mix in the vanilla extract and sour cream (and rum, if using) on medium-low speed until just incorporated. The goal is a silky, smooth batter with minimal air incorporated.
**Step 4: Master the Cheesecake Assembly.**
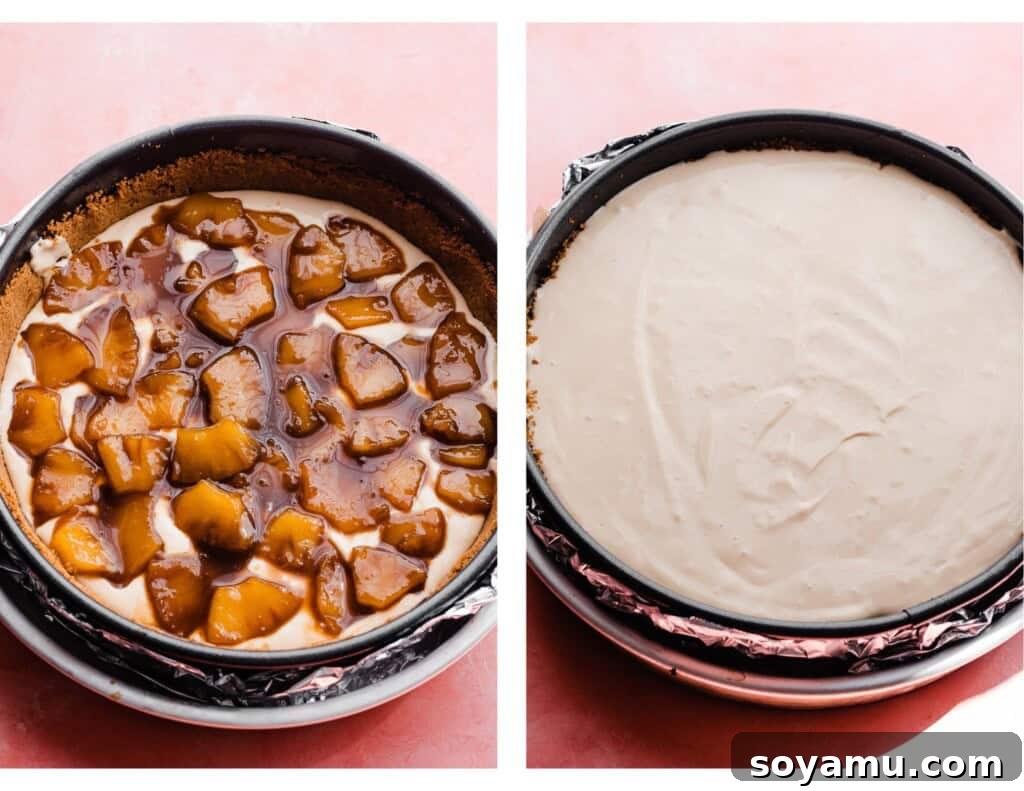
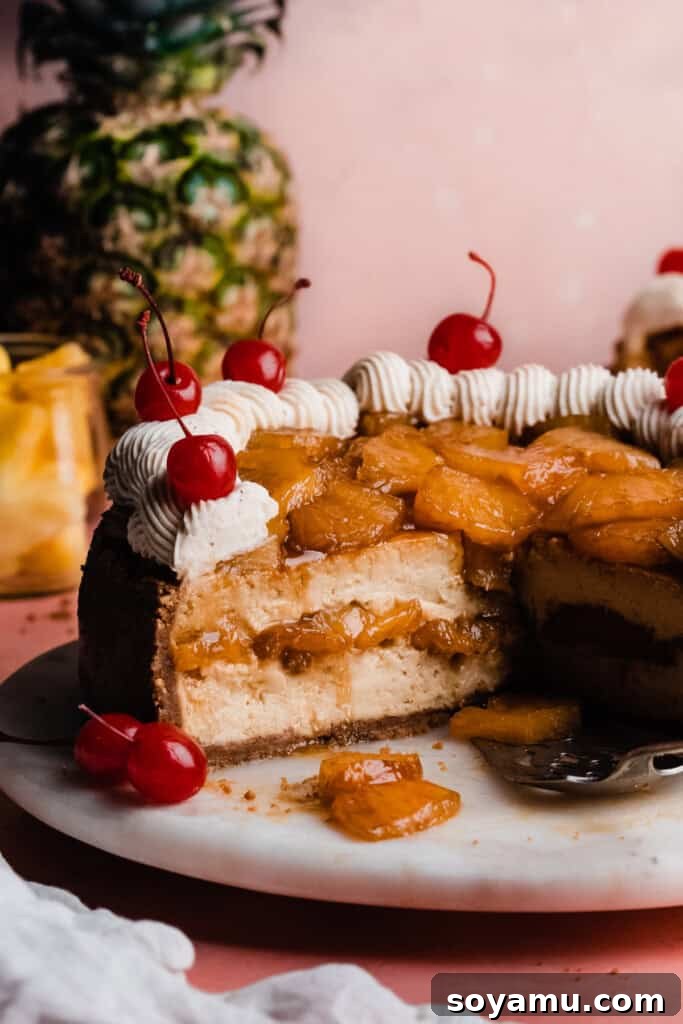
Pour half of the prepared cheesecake batter into the pre-baked graham cracker crust. Carefully spoon about one-third of the cooled pineapple filling evenly over this layer of batter. Then, gently pour the remaining cheesecake batter on top, spreading it out smoothly with an offset spatula to ensure even coverage.
**Step 5: Bake to Perfection Using a Water Bath.**
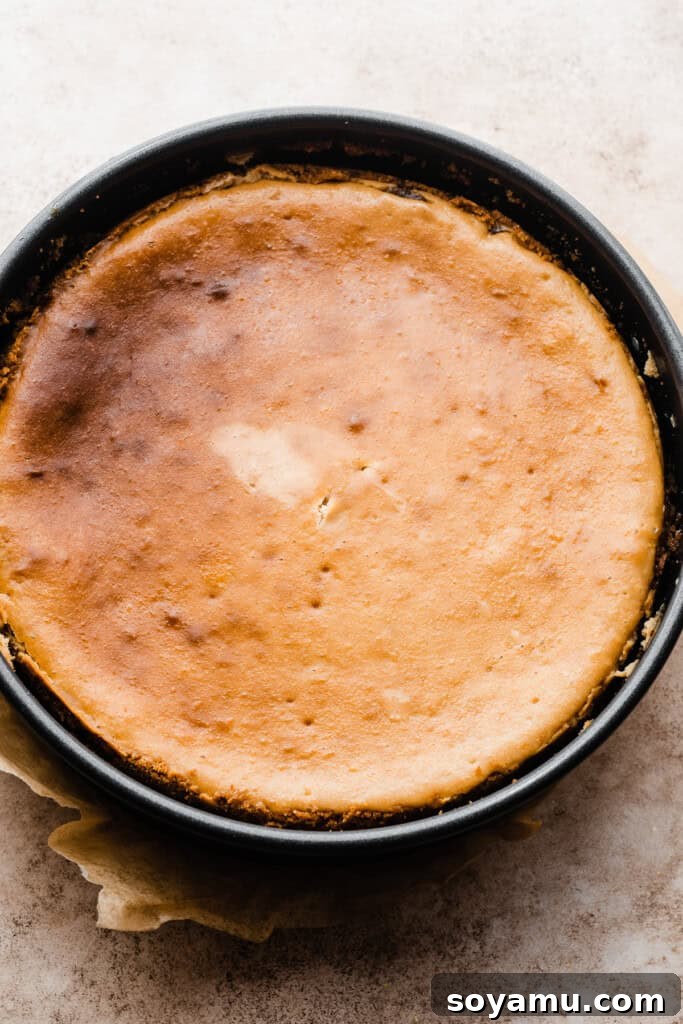
Position a roasting pan on an oven rack in the center of your preheated oven. Place the assembled springform pan (containing the cheesecake) inside a 10-inch cake pan; this outer cake pan acts as a protective barrier against any water leaks. Carefully place the springform pan (within its protective 10-inch pan) into the roasting pan. Now, pour boiling water into the roasting pan, ensuring it reaches about 2 inches deep, but do not pour it directly into the cheesecake pan. This water bath creates a steamy environment, preventing cracks and promoting an incredibly creamy texture. Bake for 1 hour and 25 minutes to 1 hour and 45 minutes, or until the edges are set and the center has a slight wobble. Turn off the oven, crack the door open, and allow the cheesecake to cool slowly in the oven for 1 hour. This gradual cooling prevents sudden temperature changes that can cause cracking.
**Step 6: Chill and Decorate Your Masterpiece.**
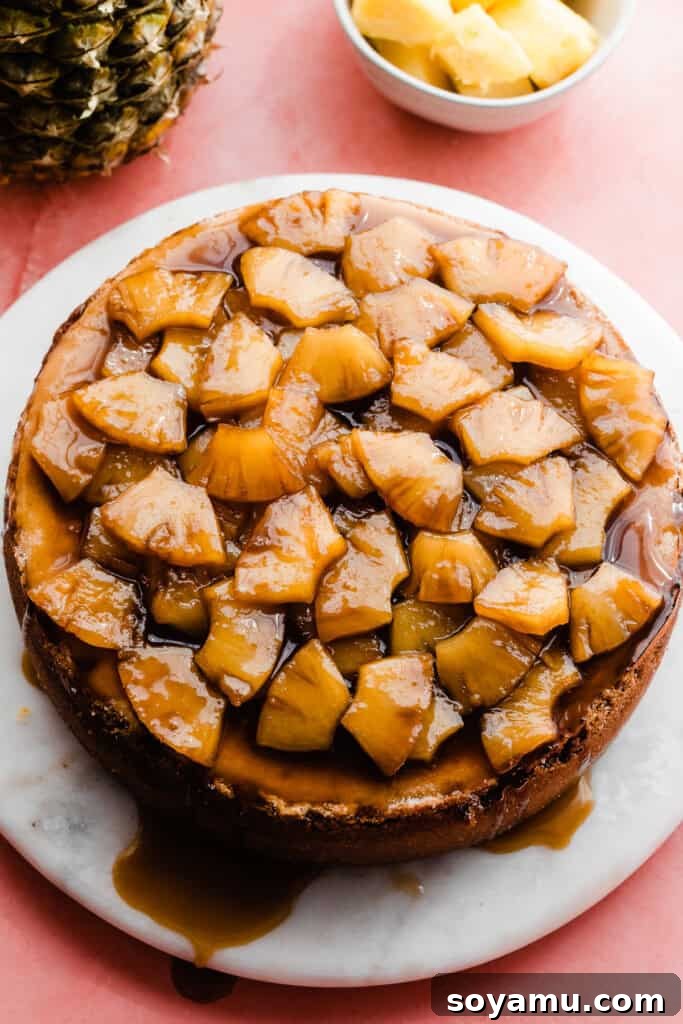
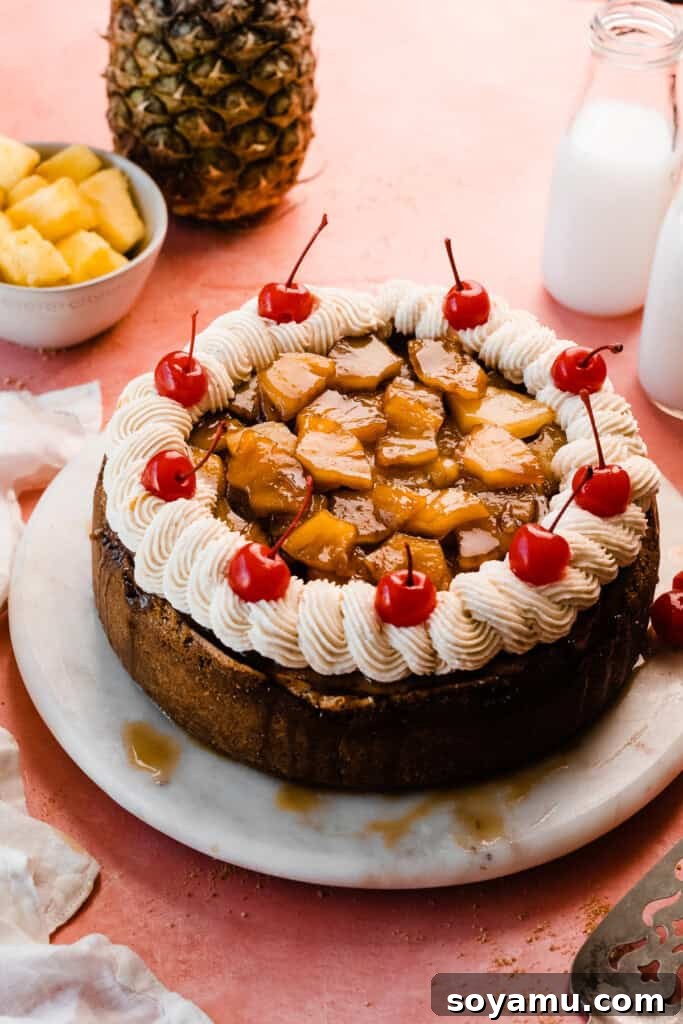
After the oven cooling period, remove the cheesecake from the oven and carefully lift the springform pan out of the water bath and the 10-inch pan. Place it on a wire rack to cool completely to room temperature. Once cooled, cover the cheesecake with foil and refrigerate for a minimum of 6 hours, or ideally, overnight (up to 1 day). This chilling period is crucial for the cheesecake to fully set and develop its exquisite texture and flavor. Just before serving, carefully remove the sides of the springform pan. Top the chilled cheesecake with the remaining caramelized pineapple compote. Pipe beautiful swirls of vanilla whipped cream around the edges or as desired, and crown each dollop with a vibrant maraschino cherry for that iconic pineapple upside-down cake presentation.
**Serving & Storage Recommendations:**
Once your magnificent Pineapple Upside Down Cheesecake is beautifully decorated, it’s ready to be sliced and served immediately! This dessert makes a fantastic centerpiece for any gathering, pairing wonderfully with a fresh cup of coffee or as the grand finale to a special meal. To store any leftover cheesecake, place it in an airtight container and refrigerate it. It will maintain its delicious freshness for 2-3 days. For pineapple enthusiasts, consider trying my delightful Piña Colada Cake or the comforting Pineapple Carrot Cake next!
**Expert Tips for Cheesecake Perfection:**
Achieving a flawless, creamy cheesecake every time involves a few key techniques. These expert tips will help you avoid common pitfalls and ensure your Pineapple Upside Down Cheesecake is a resounding success.
- **The Importance of Room Temperature Ingredients:** Bringing your cold ingredients, especially cream cheese and eggs, to room temperature (about 30-45 minutes prior to baking) is paramount. Room temperature ingredients emulsify much more easily, resulting in a velvety-smooth, lump-free cheesecake batter. If you forget, there’s a quick fix: Place eggs in a bowl of warm water for a few minutes. For cream cheese, microwave blocks for 5-6 seconds, flip, and repeat until just softened. For sour cream, warm in a bowl in the microwave for 5-6 seconds, stir, and repeat once more until it reaches room temperature.
- **Thorough Bowl Scraping:** This seemingly minor step is crucial. After adding each ingredient, use a rubber spatula to meticulously scrape down the sides and, most importantly, the bottom of your mixing bowl. Tiny lumps of cream cheese, in particular, love to hide and can compromise the texture of your finished cheesecake. Consistent scraping ensures a uniformly smooth batter.
- **Invest in an Oven Thermometer:** An oven thermometer is an indispensable tool for any baker. It provides an accurate reading of your oven’s actual temperature, which can often differ significantly from the setting on your oven dial. Maintaining a precise oven temperature is critical for cheesecake, preventing over-baking, cracking, and ensuring an even cook throughout. Keep one in your oven at all times to monitor its calibration.
- **Utilize a Kitchen Scale for Accuracy:** While cup measurements are provided, a food scale offers the highest level of accuracy for ingredients like flour, sugar, and cream cheese. Measurements can vary based on how ingredients are scooped and packed, and even between different measuring cups. Using a kitchen scale ensures consistent results by guaranteeing the exact weight of each ingredient, leading to a perfectly balanced and textured cheesecake every time.
**Frequently Asked Questions (FAQs):**
Yes, absolutely! If you’re looking for a smaller dessert, halving this recipe works beautifully. A half batch will fit perfectly into an 8×8 or 9×9 square pan. When baking, start checking for doneness around 45-50 minutes. Continue baking in 5-7 minute increments as needed until the edges are set and the cheesecake exhibits only a slight jiggle in the very center.
Yes, chilling is a non-negotiable step for cheesecake! It’s an integral part of the cheesecake’s nature. After baking, allow the cheesecake to cool completely to room temperature on a wire rack. Then, transfer it to the refrigerator to chill for at least 6 hours, or ideally, up to 1 full day before serving. This prolonged chilling period allows the cheesecake to fully set, firm up, and develop its rich, dense, and creamy texture. Rushing this step will result in a soft, unset, and less satisfying cheesecake.
A water bath (or bain-marie) is a secret weapon for baking perfect cheesecakes. The hot water surrounding the cheesecake pan generates steam, which fills the oven. This steamy environment helps the cheesecake cook gently and evenly, preventing it from drying out, cracking, or developing a rubbery texture. It also ensures that the edges and center cook at a more uniform rate, resulting in that signature silky-smooth and wonderfully creamy consistency that all great cheesecakes possess.
Preventing water from seeping into your cheesecake is a common concern, but there are reliable methods. You have two excellent options:
1. **Separate Pans:** Place the roasting pan filled with boiling water on the oven rack *below* your cheesecake. The steam will still circulate effectively without direct contact with your cheesecake pan.
2. **Double Pan Method:** This method provides an extra layer of protection. First, wrap your springform pan (containing the cheesecake) securely in heavy-duty aluminum foil. Then, place this foil-wrapped springform pan inside a slightly larger, sturdy 10-inch cake pan (or a similar pan that fits snugly). Finally, place this double-pan assembly into your roasting pan. Pour boiling water *only* into the roasting pan around the outer 10-inch cake pan, not directly into the foil-wrapped cheesecake. This second, outer pan acts as a robust barrier, virtually eliminating any chance of leakage.
**Recommended Special Tools:**
While many kitchen tools are standard, a few specific items will greatly simplify the process of making this Pineapple Upside Down Cheesecake and help ensure professional-level results.
- **Springform Pan:** A 9-inch springform pan is essential for cheesecakes. Its removable sides allow for easy release of the delicate cheesecake without damaging its pristine edges, making for a beautiful presentation.
- **10-Inch Cake Pan:** As detailed in our water bath instructions, a 10-inch cake pan serves as a crucial protective barrier. Placing your 9-inch springform pan inside it before putting it into the roasting pan prevents any potential water leaks from the water bath, ensuring your crust remains perfectly crisp.
- **Roasting Pan:** A sturdy roasting pan is indispensable for creating the vital water bath. It needs to be large enough to comfortably hold your 10-inch cake pan (which in turn holds your springform pan) and deep enough to contain about 2 inches of boiling water.
Affiliate links above.
**Explore More Favorite Cheesecake Recipes:**
If you’ve fallen in love with the creamy indulgence of this Pineapple Upside Down Cheesecake, you’ll be thrilled to discover more of our exquisite cheesecake creations. Each recipe is designed to deliver maximum flavor and delight.
- Key Lime Pie Cheesecake: Tangy, zesty, and utterly refreshing, this cheesecake captures the vibrant essence of a classic Key Lime Pie, perfect for a taste of the tropics.
- Lemon Meringue Pie Cheesecake: A delightful combination of tart lemon cheesecake topped with a billowy, toasted meringue, offering a sophisticated and sweet-tart balance.
- Salted Caramel Crème Brûlée Cheesecake: Indulge in the luxurious blend of rich caramel, a hint of salt, and the signature crunchy sugar topping of crème brûlée, all within a creamy cheesecake.
- Biscoff Cheesecake: For cookie butter lovers, this cheesecake is a dream come true, packed with the unique spiced flavor of Biscoff in every layer.
- Triple Nutella Cheesecake: A chocolate and hazelnut lover’s paradise, featuring Nutella in the crust, filling, and an irresistible ganache topping.
- Lemon Blueberry Cheesecake: A bright and fruity cheesecake, combining the refreshing zest of lemon with a luscious homemade blueberry topping.
**Did you make this recipe? Leave a comment & star rating!**
We’d love to hear how your Pineapple Upside Down Cheesecake turned out! Please take a moment to leave a comment and a star rating below. Your feedback is invaluable to us and helps our small business grow immensely. Thank you for your support!
Pineapple Upside Down Cheesecake
Stephanie Simmons
1 hour
1 hour 45 minutes
12 + slices
Ingredients
Pineapple Compote
- 6 cups pineapple rings, quartered, with juice drained & reserved, This equates to 3 cans of pineapple rings – see note #1 below. 1074 grams of pineapple
- 1 and 1/4 cups pineapple juice
- 2/3 cup + 1 tbsp dark brown sugar, packed, 300 grams
- 2 tbsp + 1 tsp corn starch
- 2 tbsp + 1 tsp water
- 2 tsp vanilla extract
- 2-3 tbsp vanilla rum or coconut rum, optional
For the Crust:
- 3 cups graham cracker crumbs, 276 grams
- 1/2 cup salted butter, melted, 113 grams
For the Cheesecake Batter
- 32 ounces full fat cream cheese, softened at room temperature , 906 grams
- 1 and 1/2 cups brown sugar, 330 grams
- 4 large eggs, at room temperature
- 3/4 cup full fat sour cream, at room temperature , 180 grams
- 2 tsp vanilla extract
For the Whipped Cream
- 4 tsp cold water
- 1 tsp plain powdered gelatin, This is available in the baking aisle of most grocery stores
- 1 cup heavy whipping cream
- 1/4 cup + 2 tbsp powdered sugar
- 2 tsp vanilla extract
For Decorating:
- maraschino cherries
Instructions
-
**Make Pineapple Filling/Topping:** In a small bowl, stir together the corn starch and water until dissolved, and set aside. Add the quartered pineapple chunks, brown sugar, and pineapple juice to a large saucepan. Stir to combine thoroughly. Heat over high heat with the lid on to speed up cooking, for 18-25 minutes, stirring occasionally. You want the liquid to reduce significantly to an almost syrupy consistency. Once reduced, lower the heat to medium-high and add the corn starch slurry (stir it again before adding to ensure it’s dissolved). Cook for 1-2 minutes more, stirring continuously, until the juices have thickened enough to coat the back of a spoon. If you drag your finger through the mixture on the back of a spoon, it should leave a distinct trail. Remove from heat and stir in the vanilla and rum (if using). Immediately transfer the filling to a large rimmed baking sheet or similar flat dish to cool quickly in the fridge. It must be completely cooled before use.
**Make-Ahead Tip:** Once cooled, store the pineapple filling in an airtight container in the fridge for 2-3 days. -
**Make the Crust:** Preheat oven to **350° F (175°C)**. Spray a 9-inch springform pan with nonstick spray. Place a piece of parchment paper over the bottom, then securely fasten the springform. Spray the inside of the pan with nonstick spray. Melt the butter and stir it into the graham cracker crumbs until well combined. Press the crust mixture firmly into the bottom and up the sides of the springform pan. Bake for 10 minutes. Set aside. **Keep the oven on at 350°F. Begin boiling water in a large pot on your stove, and prepare a large roasting pan for your water bath later.**
-
**Make the Cheesecake Filling:** _Remember that your cold ingredients need to come to room temp before you start._ In a large mixing bowl, beat the softened cream cheese with an electric mixer until creamy, about 1-2 minutes. Add the brown sugar and mix on high speed until well incorporated, about 1-2 minutes. Scrape the sides and bottom of the bowl thoroughly with a rubber spatula between each step – little lumps of cream cheese love to hide! Add the eggs one at a time, mixing on medium speed after each until just incorporated. Add the vanilla, sour cream (and rum, if using), and mix on medium-low speed until just incorporated.
_Tip: This can also be done in a stand mixer fitted with the paddle attachment._ -
**Prepare the Water Bath:** Bring the large pot of water to a boil. Get your roasting pan ready, and place the springform pan with the crust inside of a 10-inch cake pan (or a similar size pan that allows it to sit evenly inside the roasting pan).
-
**Assemble Cheesecake for Baking:** Pour half the cheesecake batter into the springform pan. Spoon about 1/3 of the cooled pineapple filling in an even layer over the batter. Carefully pour the remaining batter on top and gently smooth it out with an offset spatula. Place your roasting pan on an oven rack positioned in the center of your oven. Set the springform pan (nestled in the 10-inch pan) inside the roasting pan. Then, pour the boiling water into the **roasting pan only**, until you have water about 2 inches deep. (The 10-inch pan is your failsafe buffer against leaks!)
-
**Bake:** Bake the cheesecake for **1 hour and 25 minutes to 1 hour and 45 minutes**. When done, the cheesecake will have only a slight wobble in the center, and a knife inserted into the edge will come out clean, while the center might have just a bit of thick batter when inserted. **Turn off the oven and crack the door open. Let the cheesecake cool slowly in the oven for 1 hour before removing it.**
-
**Cheesecake Cooling:** Once the hour is up, remove the roasting pan from the oven. It should be cool enough to handle. Carefully take the springform pan out of the 10-inch pan and set it on a wire rack. Let it cool until just slightly warm or completely at room temperature, then cover with foil and refrigerate for at least 6 hours or up to 1 day before removing from the pan and serving.
-
**Make the Whipped Cream:** Add the cold water to a small bowl and sprinkle the gelatin on top. Let it sit for 4 minutes to bloom, then microwave for 5 seconds to liquify it. Keep nearby. Add the heavy whipping cream, powdered sugar, and vanilla extract to a medium bowl and beat on high speed until it begins to thicken. Then, slowly drizzle in the liquified gelatin while running the mixer on medium speed. Continue mixing on medium-high speed until stiff peaks form. Your whipped cream is stabilized and immediately ready to be piped!
_Tip: If your gelatin re-solidifies, simply microwave it for another 3-5 seconds._ -
**Serve & Store:** When ready to serve, carefully release the cheesecake from the springform pan and transfer it to a serving plate. Top the cheesecake with the remaining pineapple topping, and pipe on the whipped cream (a Wilton 4B tip works wonderfully for this). Add maraschino cherries for a colorful garnish, then slice and enjoy! Store any leftovers in an airtight container in the fridge for 3-4 days.
Notes
**Ripe Pineapples:** A ripe pineapple should feel firm but not rock-hard, nor soft. It should be turning yellow on the outside, and you should smell a distinct ripe pineapple aroma when sniffing the base. You should also be able to pluck one of the leaves without too much effort.
**For more tips and additional information, please be sure to read the blog post above! There is a table of contents at the beginning of the post to help you navigate to various topics.**
Nutrition
Calories: 804kcal,
Carbohydrates: 86g,
Protein: 10g,
Fat: 47g,
Saturated Fat: 27g,
Polyunsaturated Fat: 2g,
Monounsaturated Fat: 13g,
Trans Fat: 0.3g,
Cholesterol: 190mg,
Sodium: 484mg,
Potassium: 434mg,
Fiber: 2g,
Sugar: 69g,
Vitamin A: 1783IU,
Vitamin C: 14mg,
Calcium: 185mg,
Iron: 2mg
Nutrition information is automatically calculated, so should only be used as an approximation.