
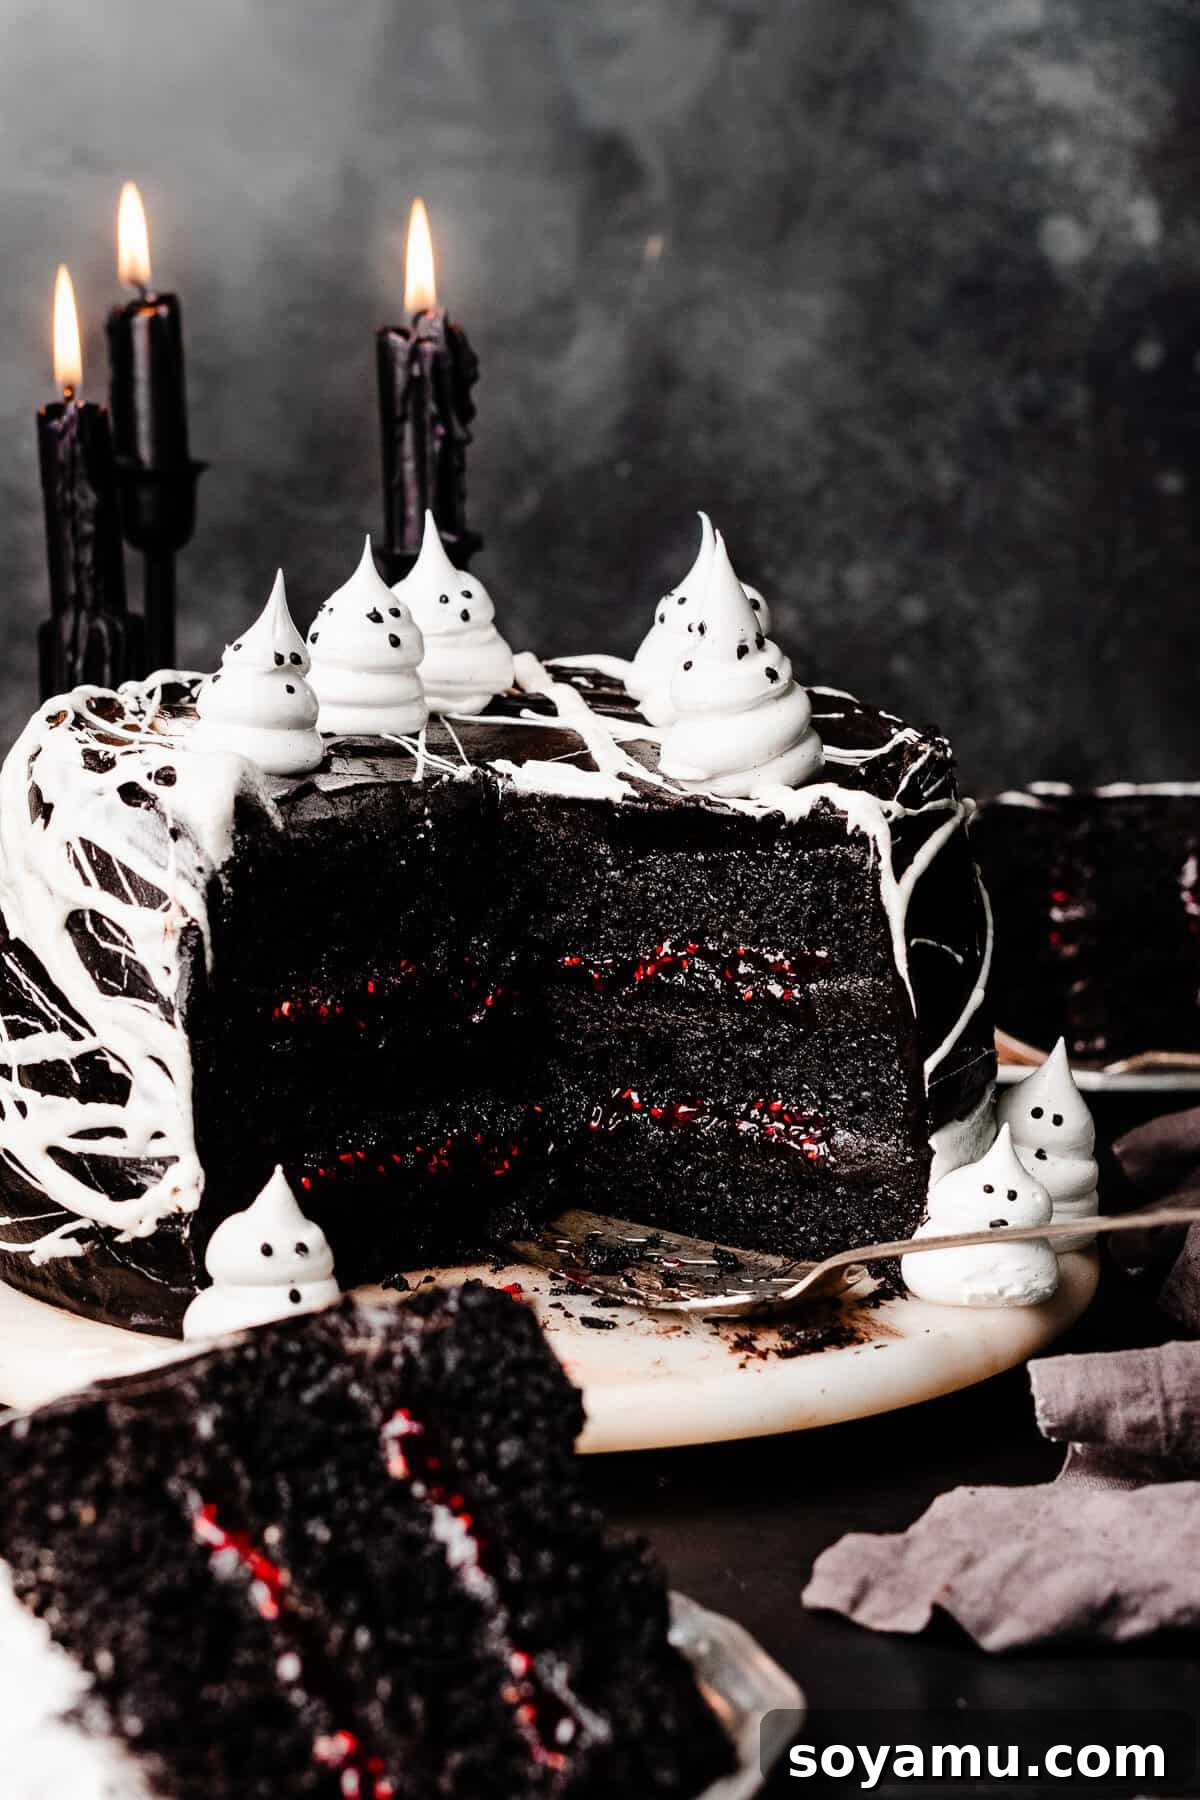
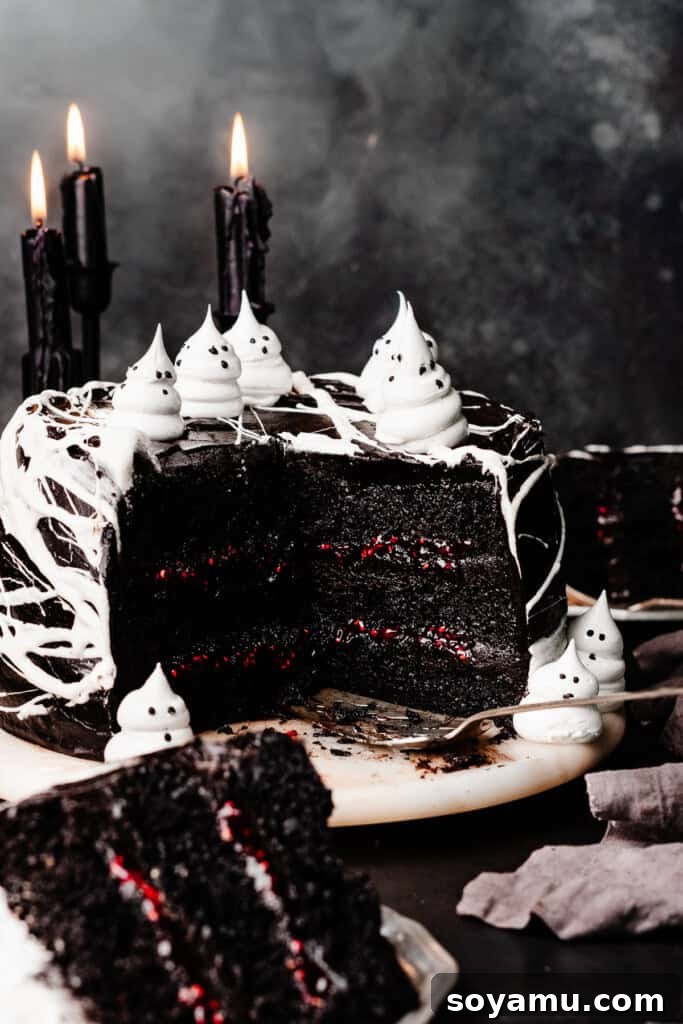
Prepare to be enchanted by the Ultimate Black Velvet Cake – a dessert that promises an unforgettable experience with every decadent bite. This isn’t just any chocolate cake; it’s a masterpiece of flavor and texture, featuring ultra-moist, deeply chocolate cake layers that boast a dramatic, naturally dark hue. Sandwiched between these luscious layers is a vibrant burst of sweet and tangy raspberry jam, perfectly complementing the rich cocoa. The entire creation is then enveloped in a silky, fudgy chocolate frosting, achieving its intense black color and profound chocolate taste through the magic of black cocoa powder, eliminating the need for any artificial food dyes. Whether you’re planning a sophisticated dinner party, a festive holiday gathering, or a spooky Halloween celebration, this Black Velvet Cake is guaranteed to be the show-stopping centerpiece that delights all senses and leaves a lasting impression.
Why You’ll Fall in Love with This Black Velvet Cake:
This Black Velvet Cake isn’t just a recipe; it’s an invitation to experience chocolate perfection. Here’s why this cake will quickly become your new favorite and a cherished recipe in your baking repertoire:
- Unrivaled Rich & Moist Chocolate Cake: Forget dry, crumbly cakes. This recipe delivers an exceptionally moist chocolate cake experience – so moist it practically melts in your mouth, yet remains wonderfully light and utterly rich. Each forkful is a testament to perfect baking, ensuring a delightful texture that will have everyone asking for seconds and wondering about your secret.
- Effortlessly Elegant & Easy Recipe: Despite its impressive and sophisticated appearance, this black velvet cake recipe is surprisingly straightforward and easy to follow. We’ve broken down each step to be simple and clear, ensuring even novice bakers can achieve stunning, bakery-quality results. The decorating steps are also designed for simplicity, allowing all skill levels to create a beautifully finished cake without stress or complicated techniques.
- Luxurious Black Cocoa Frosting: The star of this cake’s dramatic look and deep, complex flavor is the velvety chocolate frosting. Crafted with premium black cocoa powder, it offers an intensely fudgy chocolate taste and a striking, jet-black color, reminiscent of a classic Oreo cookie. This frosting is not just beautiful; it’s incredibly rich, smooth, and perfectly balances the cake’s sweetness, making every bite a heavenly indulgence.
- Bright Raspberry Filling Surprise: Tucked delicately between the dark chocolate layers is a luscious, vibrant raspberry filling. This delightful addition provides a bright, tangy contrast to the deep, rich chocolate, expertly cutting through the richness and adding an unexpected burst of fresh, fruity flavor that elevates the entire cake. It’s a flavor pairing that’s truly irresistible and adds a gourmet touch.
- Naturally Dark & Delicious: Achieve a gorgeous, deep black cake and frosting without a single drop of artificial food coloring. The secret lies in using high-quality black cocoa powder, which naturally imparts an intense dark color and an even richer chocolate profile. This means you can enjoy a stunning, dramatic cake that’s as wholesome as it is visually captivating, relying solely on natural ingredients for its remarkable appearance and taste.
Essential Ingredients for Your Black Velvet Masterpiece:
Crafting this magnificent Black Velvet Cake begins with selecting the right ingredients. Each component plays a vital role in achieving its signature flavor, texture, and dramatic appearance. While the full recipe with precise measurements and detailed directions can be found in the comprehensive recipe card at the bottom of this page, here’s an overview of the key players and why they matter for your baking success:
- Black Cocoa Powder: This is the unparalleled secret ingredient for the cake’s striking deep black color and incredibly rich, less bitter chocolate flavor, all achieved without any artificial dyes. Black cocoa powder is highly processed (Dutch-processed), resulting in a very dark, low-acid powder that delivers a distinct flavor profile, much like what gives iconic Oreo cookies their signature dark hue and taste. For an authentic “black velvet” effect, sourcing this ingredient is key. You can easily find high-quality black cocoa powder online (a recommended brand is often linked in the recipe notes below for your convenience).
- High-Quality Butter (Salted or Unsalted): I personally favor salted butter to subtly enhance the overall flavor profile of both the cake and frosting, adding a touch of depth and complexity. However, unsalted butter works perfectly if that’s your preference, allowing you to precisely control the salt level independently. Unlike many cake recipes that rely on vegetable oil, butter provides unparalleled richness, a more tender crumb, and a complex, luxurious flavor to our cake layers. Ensure your butter is softened to true room temperature for optimal creaming and smooth batter integration.
- Full-Fat Sour Cream: A crucial ingredient for injecting moisture and contributing to an incredibly tender crumb. Full-fat sour cream adds a wonderful richness and a slight tang that beautifully complements and balances the deep chocolate flavors. It also plays a significant role in achieving the cake’s signature moist and decadent texture. Always use room temperature sour cream to ensure it incorporates smoothly and evenly into the batter without curdling or creating a lumpy consistency.
- Cake Flour: For an exceptionally delicate, soft, and tender cake crumb, cake flour is highly recommended. It boasts a lower protein content compared to all-purpose flour, which inhibits excessive gluten development and results in a finer, lighter texture that’s truly melt-in-your-mouth. When measuring, always spoon and level your flour, or better yet, use a reliable kitchen scale for utmost precision (remember, 1 cup of cake flour is approximately 110 grams, whereas 1 cup of all-purpose flour is around 130 grams). Scooping directly from the bag can compact the flour, leading to an excess amount and consequently a dry, dense cake.
- Large Eggs (Room Temperature): Eggs are multifaceted ingredients in baking: they bind the components, add crucial structure, contribute to the cake’s richness, and help with leavening. Using large eggs that have come to room temperature is essential for success. Room temperature eggs emulsify much more effectively with other ingredients, creating a smoother, more uniform batter that traps air efficiently. This ultimately contributes to a lighter, fluffier cake with a more even and tender crumb.
- Milk (Any Fat Content): I typically use 2% milk for my baking simply because it’s a household staple, but rest assured, any milk fat percentage will work perfectly in this recipe. Milk adds necessary liquid to the batter, contributing to a tender texture and ensuring proper consistency. Just like the other dairy products and eggs, ensure your milk is at room temperature for the best results, as this aids in smooth incorporation.
- Full-Fat, Block-Style Cream Cheese: This specific type of cream cheese is absolutely essential for creating a truly rich, velvety, and stable chocolate frosting. Opt for full-fat, block-style cream cheese over whipped or spreadable varieties, as these often contain too much water and can lead to a runny, unstable frosting. Just like your butter, ensure it’s softened to room temperature for a smooth, lump-free frosting that’s a dream to spread.
- Sweet Raspberry Preserves: For the delightful and bright filling nestled between the cake layers, raspberry preserves are highly recommended over simple jam. Preserves typically contain more substantial fruit pieces, offering a superior, more intense flavor and a more luxurious texture that truly shines against the deep chocolate backdrop. The slight tartness of the raspberries beautifully cuts through and balances the richness of both the black velvet cake and its decadent frosting, creating a harmonious flavor profile.
- Other Baking Staples: Don’t forget your other foundational baking ingredients: granulated sugar and light brown sugar contribute both sweetness and essential moisture. Baking soda and baking powder work in tandem to provide the cake’s perfect lift and tender texture. A touch of salt is crucial for balancing and enhancing all the sweet flavors. Vanilla extract adds a warm, aromatic depth. Espresso powder (don’t worry, it won’t make your cake taste like coffee!) serves to remarkably deepen and intensify the chocolate flavor, making it even more profound. Finally, white vinegar activates the baking soda and helps to further enhance the already dramatic dark hue of the black cocoa.
Thoughtful Recipe Substitutions to Consider:
While this recipe is meticulously crafted for the ultimate Black Velvet Cake experience, here are a couple of common substitutions you can make if you find yourself short on a specific ingredient, ensuring you can still enjoy a delicious homemade cake:
- Cocoa Powder Alternatives: If authentic black cocoa powder is unavailable or difficult to find, you can substitute with Dutch-processed cocoa powder. While it won’t yield the same intense, jet-black color, it will still provide a rich, dark chocolate flavor. It’s important to avoid using natural cocoa powder in this recipe, as its higher acidity would react differently with the baking soda and powder, potentially affecting the cake’s rise and texture.
- Buttermilk Substitute: No buttermilk on hand? No problem! You can easily create a suitable substitute at home. Simply pour 3/4 cup of regular milk (any fat percentage) into a liquid measuring cup and add 3/4 tablespoon of white vinegar or fresh lemon juice. Stir it gently and let it sit undisturbed for 5-10 minutes. During this time, the milk will slightly curdle and thicken, creating an acidic environment that mimics buttermilk, perfect for contributing to the cake’s tender crumb and activating leavening agents.
Crafting Your Black Velvet Cake: A Step-by-Step Guide for Perfection:
Creating this stunning Black Velvet Cake is a rewarding and enjoyable process. Follow these detailed steps meticulously to ensure a perfect, show-stopping dessert that will impress everyone.
Step 1: Prepare Your Baking Environment & Bloom the Cocoa Powder
Begin by preheating your oven to a precise 350°F (175°C). This ensures a consistent baking temperature from the moment your cakes enter the oven. Next, thoroughly prepare three 9-inch round cake pans: grease each pan generously with shortening or softened butter, ensuring full coverage. Then, place a perfectly sized parchment paper circle in the bottom of each pan, and grease the parchment paper as well. Finally, dust the entire inside of each prepared pan with all-purpose flour, tapping out any excess. This meticulous preparation is crucial for preventing sticking and ensuring your beautifully baked cake layers release cleanly and easily.
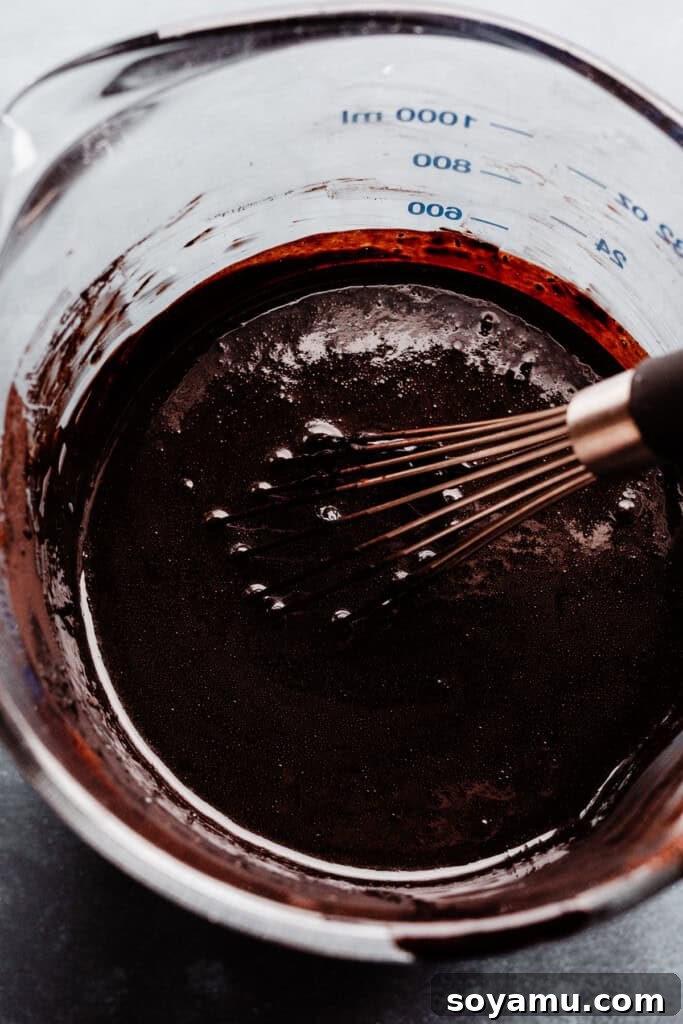
The next vital step is to “bloom” the black cocoa powder, a technique that significantly intensifies its chocolate flavor. In a large, heat-proof 4-cup glass measuring cup or a spacious bowl, add the specified amount of hot water. Whisk in the black cocoa powder until it is completely dissolved and the mixture is smooth, free of any lumps. Set this rich, dark liquid aside and allow it to cool down completely to room temperature. Blooming the cocoa powder with hot liquid brings out its full aromatic potential and deepens its color, resulting in an even more robust and profound chocolate taste in your finished black velvet cake.
Step 2: Master the Art of Cake Batter Creation
In a generously sized mixing bowl, combine all your dry ingredients: the precisely measured cake flour, both light brown sugar (packed for accuracy) and granulated sugar, baking soda, baking powder, a pinch of salt, and the espresso powder. Whisk these dry components together thoroughly, paying special attention to breaking up any lumps in the brown sugar to ensure an even distribution. The espresso powder here serves a special purpose; it doesn’t make the cake taste like coffee, but rather remarkably deepens and enhances the natural chocolate flavor, making it even more profound and complex.
Once your bloomed cocoa mixture has cooled to room temperature, add the full-fat sour cream, buttermilk, vegetable oil, and vanilla extract to it. Whisk this wet mixture until all ingredients are well combined and homogenous. In a separate small bowl, lightly beat the room-temperature eggs. Now, pour the cocoa and dairy wet ingredients into the bowl containing your dry ingredients. Add the lightly beaten eggs and the white vinegar. Gently whisk everything together using a light hand, mixing only until the ingredients are *just* combined and no streaks of dry flour remain. It is absolutely crucial not to overmix the batter; excessive mixing develops gluten, which can lead to a tough, dense, and less tender cake. A few small lumps in the batter are perfectly normal and will bake out without affecting the final texture. Finally, use a rubber spatula to scrape down the sides and bottom of the bowl thoroughly, ensuring no hidden pockets of dry ingredients are left behind, guaranteeing a perfectly uniform batter.
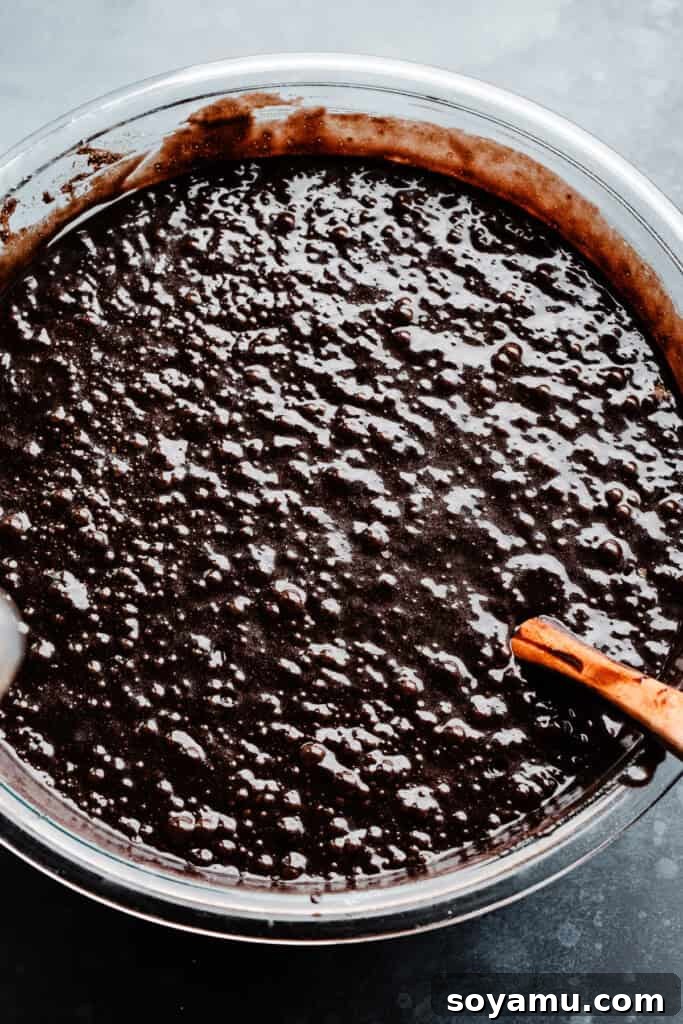
Step 3: Bake the Cake Layers to Golden Perfection
Carefully and evenly divide the prepared cake batter among your three greased and floured 9-inch cake pans. For truly consistent layers and an even bake, it’s highly recommended to use a kitchen scale to accurately weigh the batter in each pan – aim for approximately 770 grams per pan. This precision ensures all layers bake uniformly, resulting in a beautifully leveled cake. Place the pans in your preheated oven and bake for 24 to 27 minutes. The cakes are perfectly done when a toothpick inserted into the center emerges with moist crumbs attached, but not wet batter. During the baking process, consider rotating your cake pans halfway through (e.g., swapping top-to-bottom or front-to-back) to account for any hot spots in your oven, which promotes even baking and consistent color across all layers.
Once baked, promptly remove the cakes from the oven and allow them to cool in their pans on a sturdy wire rack for precisely 10 minutes. This crucial cooling period allows the delicate cake structure to set and firm up within the confines of the pan. After 10 minutes, gently run a thin butter knife or offset spatula around the edges of each pan to loosen the cake. Then, carefully invert the layers onto the wire rack to cool completely. It is absolutely essential that the cake layers are completely cool to the touch – firm and no longer warm – before you attempt to frost them; frosting applied to warm cakes will melt and slide off, making assembly a challenging and messy endeavor!
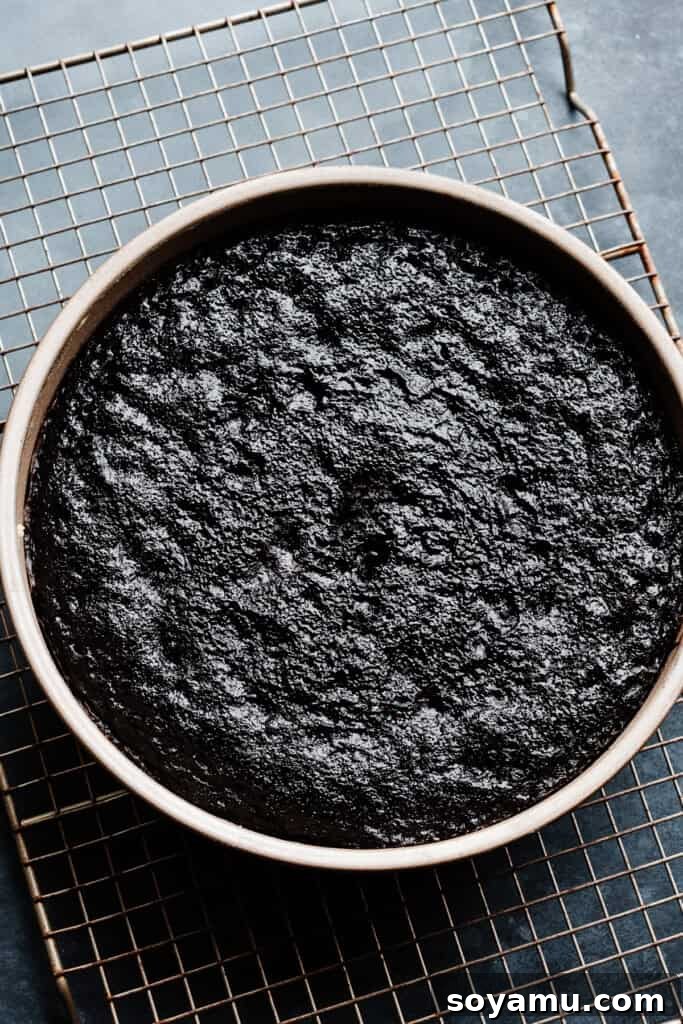
Step 4: Whip Up the Silky & Fudgy Chocolate Frosting
While your cake layers are cooling, prepare the indulgent and luxurious black cocoa frosting. In a large mixing bowl, beat the softened, room-temperature salted butter with an electric mixer on high speed until it becomes wonderfully creamy and light, typically taking about 30 seconds. Gradually add the powdered sugar in three separate additions, mixing thoroughly between each until fully combined and smooth. If at any point the mixture seems too stiff or dry, add a tablespoon or two of milk as needed, one at a time, to achieve a perfectly spreadable and silky consistency. Incorporate the vanilla extract and a pinch of salt to enhance and balance the overall flavors. For an optional but recommended beautiful sheen and added stability, you can add 3 tablespoons of corn syrup.
Next, beat in the black cocoa powder until it’s fully incorporated, ensuring the frosting takes on a deep, uniform, and rich black color. Finally, and this is a critical step for a stable and perfectly textured frosting, beat in the full-fat, block-style cream cheese *last*. Mix only until it is well combined and smooth, taking care not to overmix. Overmixing cream cheese can introduce too much air or break down its structure, often resulting in a runny or “weepy” frosting. If at any point your frosting seems too soft, loose, or runny, don’t panic! Simply place the entire bowl of frosting into the refrigerator or freezer for 20 minutes to 2 hours (depending on the severity of the runniness) to help it firm back up. A perfectly chilled and firm frosting is much easier to work with and spread smoothly.
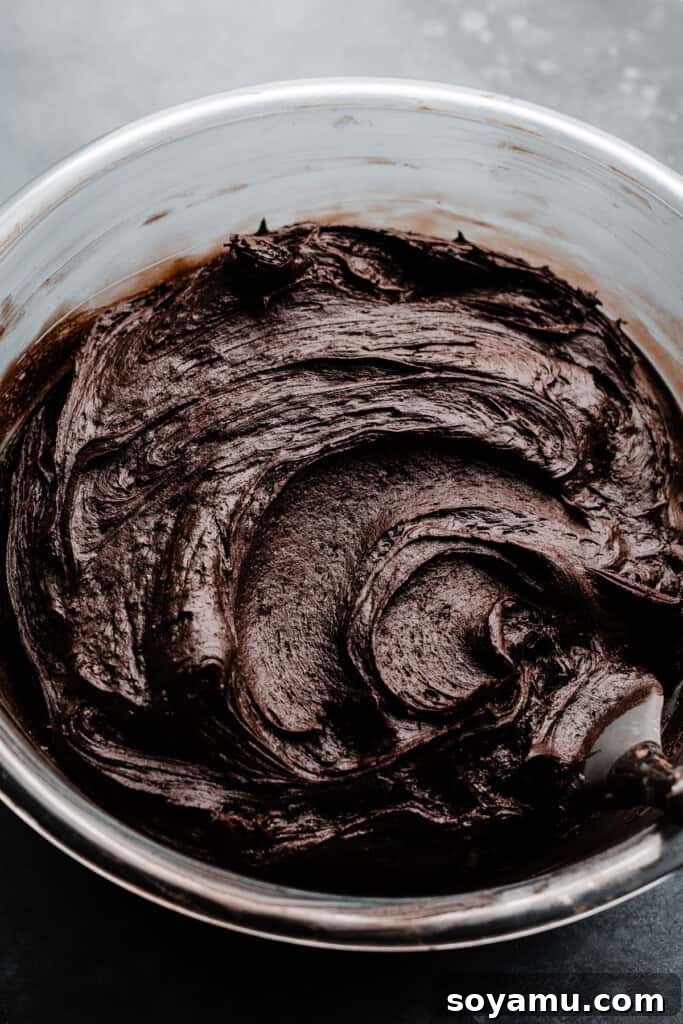
Step 5: Assemble Your Magnificent Black Velvet Cake with Precision
Now for the most exciting part – assembling your stunning Black Velvet Cake! Begin by placing the first completely cooled cake layer onto a cake stand. For ultimate ease and professional-looking results, ideally position your cake stand on a cake turntable. Spread approximately 1 and 1/4 cups (about 345 grams) of your silky chocolate frosting evenly over this layer, allowing it to extend slightly past the edge. Using a piping bag fitted with a round tip (or, if you don’t have one, simply snip a small corner off a sturdy plastic bag), pipe a neat, continuous border of frosting around the entire perimeter of the cake layer. This border will act as a dam.
Within this piped frosting border, evenly spread about 1/3 cup of the luscious raspberry preserves, using an offset spatula to ensure it reaches the edges of your frosting dam without spilling over. This creates a beautiful, vibrant burst of flavor in the center. Carefully place the second cake layer directly on top. Gently press down to secure it, and use an offset spatula to spread out any frosting that might have squeezed out between the two layers, creating a clean seal. To prevent the layers from sliding and to set the filling, pop the cake into the fridge for 10-15 minutes to allow the frosting to firm up slightly. Repeat the frosting and raspberry filling process precisely on the second layer. After filling, chill the cake again for another 10-15 minutes before adding the third and final cake layer. For a perfectly flat and level cake top, always place the third layer upside down.
Next, apply a thin, even layer of frosting over the entire outside of the cake – this is known as your “crumb coat.” The purpose of the crumb coat is to trap any loose crumbs from the cake, ensuring they don’t mix into your final layer of frosting for a flawlessly smooth finish. Don’t worry if this layer isn’t perfect or looks a bit messy; it’s simply the base! Chill the cake in the fridge for at least 30 minutes, or until the crumb coat is firm and no longer sticky. Once chilled, apply the remaining chocolate frosting generously to the top and sides of the cake. Use a cake scraper or a clean offset spatula to achieve a beautifully smooth and polished finish, rotating the turntable as you work for even results. For the best flavor development and to allow the frosting to fully set, chill the assembled cake for at least 1 hour (or even overnight) before proceeding with decoration and serving.
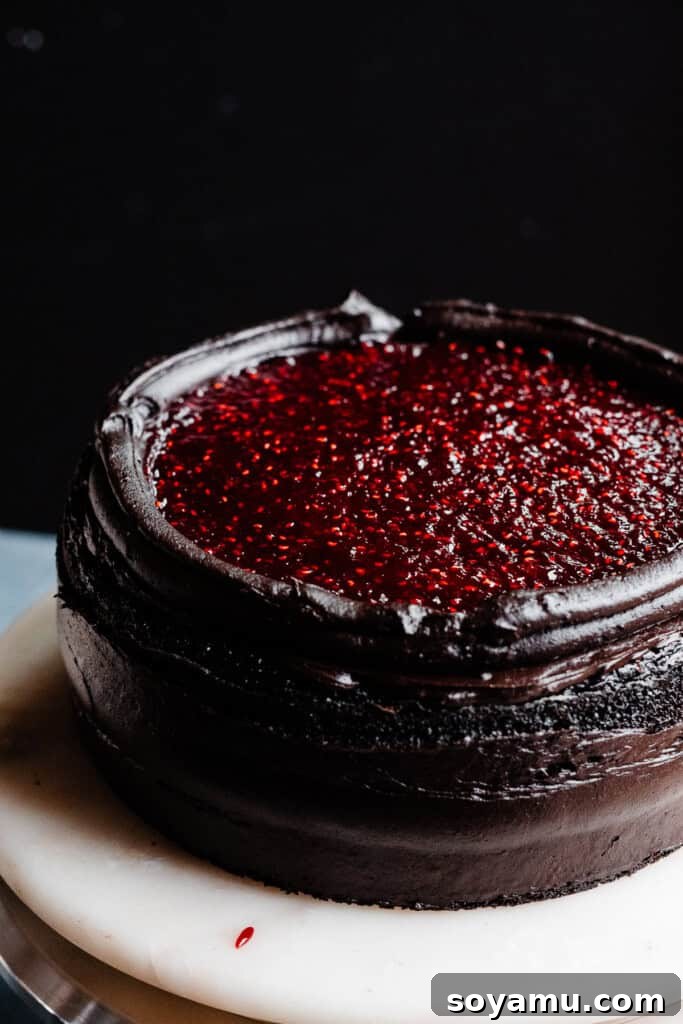
Step 6: Decorate Your Spooktacular Cake (Optional Halloween Theme)
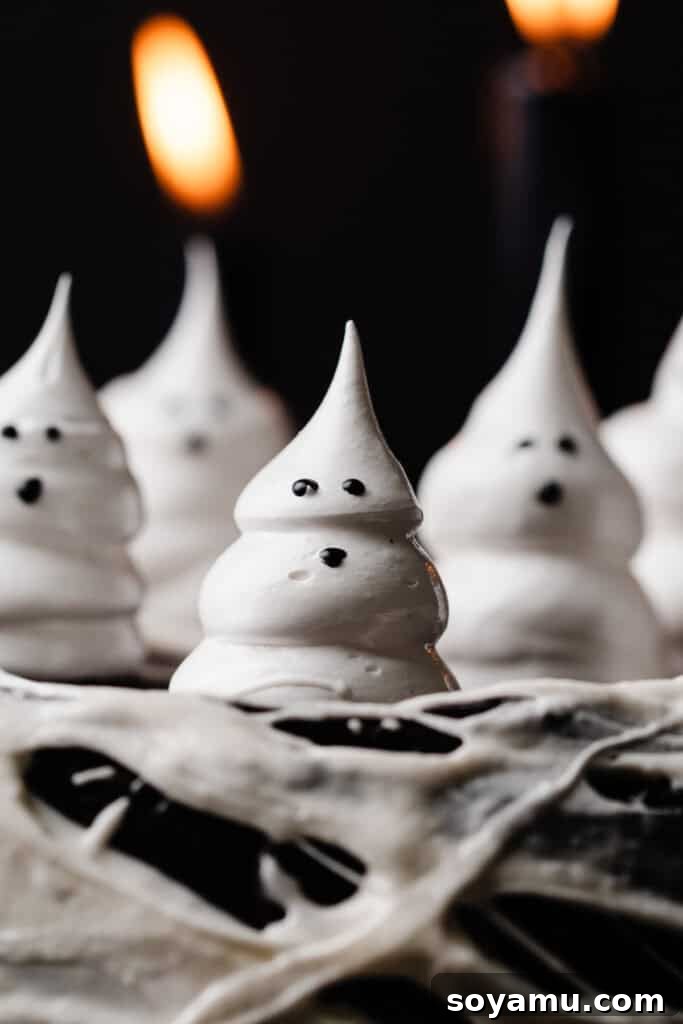
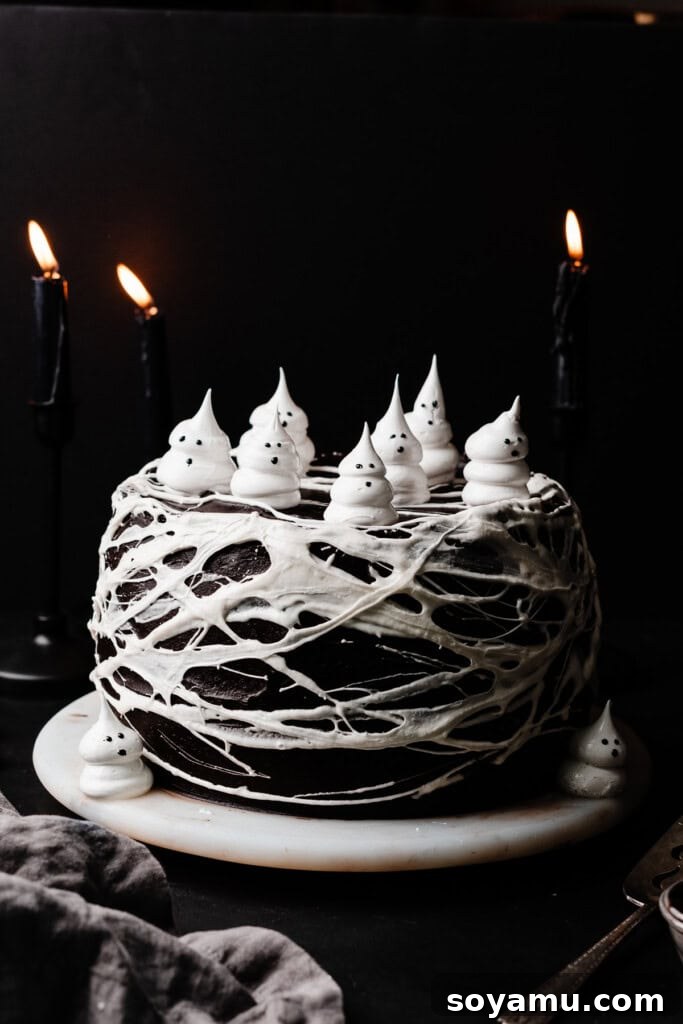
For a festive and fun Halloween touch that’s sure to impress, consider adding whimsical meringue ghosts and eerie marshmallow spiderwebs! To create adorable, light-as-air meringue ghosts, you can follow a detailed Swiss Meringue recipe (a fantastic one with step-by-step photos is often linked in recipe notes, which makes it easy even if you’ve never made meringue before). The stability of Swiss Meringue makes it perfect for piping delicate shapes. Alternatively, for a quicker and simpler approach, use clean kitchen scissors to cut large marshmallows into rounded ghost shapes – a delightful shortcut for instant spooky charm.
For the hauntingly realistic spiderwebs, melt 5-8 large marshmallows in a microwave-safe bowl for 10-20 seconds until they are just softened and gooey. Stir them vigorously until they form a cohesive, incredibly sticky mass, then let them cool for a few seconds – just enough so they are warm, pliable, but safe and comfortable to handle. With clean fingertips, dip into the molten marshmallow and gently stretch the sticky strands around the sides and across the top of your thoroughly chilled cake. The stretching motion will naturally create thin, wispy, and wonderfully eerie spiderweb effects. Once the spiderwebs are artfully in place, arrange your prepared meringue or marshmallow ghosts on top of the cake. Use a small tube of black gel frosting to pipe charming eyes and expressive mouths onto your ghosts, bringing them to life with personality! Remember to add the ghosts *after* the spiderwebs to ensure they stand out prominently against the webbed backdrop.
Serving Suggestions & Storage Tips:
Once your Black Velvet Cake is beautifully decorated and thoroughly chilled, it’s ready to be sliced and served! For the cleanest, most elegant cuts, use a sharp, thin knife. For best results, dip your knife in hot water and wipe it clean with a towel between each slice. This technique will help you achieve perfect, pristine portions every time. This cake is best served at a slightly cool room temperature, allowing the rich frosting to soften just enough to be creamy and luscious, while the cake itself remains firm and perfectly structured.
Storing Leftovers: Any leftover slices or the remaining whole cake should be stored promptly in an airtight container in the refrigerator. This is crucial for preserving its exceptional moisture and keeping the cream cheese frosting fresh and safe. The cake will remain wonderfully delicious for 3-4 days when stored correctly. For longer storage, you can also freeze individual slices or even the entire cake (un-decorated or simply crumb-coated). To freeze, wrap the cake tightly in several layers of plastic wrap, followed by a layer of heavy-duty aluminum foil to prevent freezer burn. It can be frozen for up to 2-3 months. When ready to enjoy, thaw it overnight in the refrigerator before bringing it to a cool room temperature for serving.
Serving Ideas & Pairings: While this Black Velvet Cake is sensational and complete on its own, consider enhancing the experience with a few thoughtful additions. A dollop of freshly whipped cream can add a delightful lightness, or a side of extra raspberry preserves can intensify the fruity tang. For an added touch of indulgence, a scoop of premium vanilla bean ice cream or a drizzle of dark chocolate sauce would be exquisite. This cake also pairs wonderfully with a strong cup of coffee, a glass of cold milk, or even a robust red wine for an adult pairing.
Craving More Chocolate Cake? Explore These Delicious Recipes!
If you’re a true chocolate enthusiast who simply can’t get enough of rich, decadent cakes, then you’re in for an absolute treat! After mastering this impressive Black Velvet Cake, be sure to explore these other fantastic chocolate cake creations from our collection. Each recipe offers a unique twist on this beloved dessert:
- Peanut Butter Chocolate Cake: Indulge in the universally adored classic combination of rich chocolate and creamy peanut butter, baked into a truly heavenly cake form.
- Eggless Chocolate Cake: Discover a wonderfully moist, tender, and incredibly flavorful chocolate cake, perfect for those with egg allergies, dietary preferences, or who simply prefer an egg-free baking option without compromising on taste.
- Raspberry Chocolate Ganache Cake: Elevate your dessert game with this sophisticated cake, featuring luscious, smooth chocolate ganache beautifully paired with bright, tart raspberry flavors for an elegant and unforgettable treat.
- Nutella Chocolate Cake: Dive into the irresistible hazelnut and chocolate flavors of Nutella, skillfully baked into a supremely decadent and moist cake that’s a dream for any Nutella lover.
- Tuxedo Cake: A visually stunning cake offering a delightful contrast with its layers of intense dark chocolate and airy, whipped white chocolate ganache, delivering both elegance and incredible flavor.
- German Chocolate Cake: A timeless American classic, featuring moist chocolate layers generously topped with a sweet, rich coconut-pecan frosting that’s utterly irresistible.
- Easy Bailey’s Chocolate Cake: An adult-friendly and remarkably easy-to-make treat that combines the rich notes of chocolate with the creamy, Irish whiskey-infused flavor of Bailey’s Irish Cream.
Did you bake this delightful recipe? Share your experience and leave a star rating!
We love hearing from you and seeing your wonderful creations! Please consider leaving a comment and a star rating below to let us know how much you enjoyed making and tasting this Black Velvet Cake. Your valuable feedback is incredibly important and greatly supports our small business and helps other bakers in our community. Just click the little stars in the header of the recipe card below to leave your rating! Thank you for baking with us!
Black Velvet Cake
Stephanie Simmons
2 hours
25 minutes
2 hours
25 minutes
12 slices
Pin Recipe
Print Recipe
Ingredients
For the Chocolate Cake
- 1 ½ cups hot water, 340 mL
- 1 cup black cocoa powder, 102 grams
- 3 cups + 1 tbsp cake flour, spooned & leveled, 342 grams
- 2 cups light brown sugar, packed, 440 grams
- 1 cup granulated sugar, 210 grams
- 3 tsp baking soda, 17 grams
- 1 ½ tsp baking powder, 5 grams
- ¾ tsp salt
- 1 tbsp espresso powder
- 1 ½ cups full fat sour cream, at room temperature, 360 grams
- ¾ cup buttermilk, at room temperature, 187 mL
- 4 large eggs, at room temperature
- ½ cup + 1 tbsp vegetable oil, 102 mL
- 1 tbsp vanilla extract
- 2 tbsp white vinegar, 34 mL
For the Chocolate Frosting
- 1 ½ cups salted butter, softened at room temperature, 3 sticks, or 339 grams
- 7 ⅓ cups powdered sugar, 843 grams, adjusting to taste
- 1-2 tbsp milk, as needed, to help the sugar & butter combine, 15 to 30 g
- 3 tbsp corn syrup, optional, gives the frosting a nice shine, 15 to 45 g
- 1 tbsp vanilla extract
- pinch of salt, to taste
- 2 cups black cocoa powder, 222 grams
- 12 ounces full fat cream cheese, block style – 340 grams
For Filling
- ⅔ cup raspberry preserves, 200 grams
For the Meringue Ghosts:
- 2 large egg whites, at room temperature, It’s easier to separate them while cold, then let them come to room temperature in a bowl.
- ½ cup granulated sugar, 105 grams
- ¼ tsp cream of tartar
- pinch of salt
- 2 tsp vanilla extract
For Decorating
- 6 large marshmallows
- 1 small tube of black gel frosting
Instructions
-
1. Prep & Bloom Cocoa: Preheat your oven to 350 °F (175 °C). Grease three 9-inch cake pans with shortening, place a parchment circle in the bottom of each, grease over that, and dust well with flour, knocking out excess. Measure 1 ½ cups hot water into a 4-cup glass measuring cup or large bowl, then whisk in 1 cup black cocoa powder until completely dissolved. Set aside to cool to room temperature.
-
2. Make Cake Batter: In a large mixing bowl, whisk together 3 cups + 1 tbsp cake flour, 2 cups packed light brown sugar, 1 cup granulated sugar, 3 tsp baking soda, 1 ½ tsp baking powder, ¾ tsp salt, and 1 tbsp espresso powder, ensuring no lumps in the brown sugar. Once the bloomed cocoa mixture is at room temperature, add 1 ½ cups full-fat sour cream, ¾ cup buttermilk, ½ cup + 1 tbsp vegetable oil, and 1 tbsp vanilla extract to it. Whisk well. Pour this into the bowl of dry ingredients. Lightly beat 4 large eggs in the same measuring cup, then add them along with 2 tbsp white vinegar to the main bowl. Whisk until just combined; do not overmix. Scrape the sides and bottom of the bowl to incorporate any dry bits.
-
3. Bake Cake Layers: Divide the batter evenly between the three prepared pans (approx. 770 grams per pan if using a kitchen scale). Bake for 24 to 27 minutes, or until a toothpick inserted into the center pulls out moist crumbs. Let cakes cool in pans on wire racks for 10 minutes before inverting onto a cooling rack to cool completely. Tip: Rotate cake pans halfway through baking for an even result.
-
4. Make Chocolate Frosting: In a large bowl, beat 1 ½ cups softened salted butter until creamy (about 30 seconds). Gradually beat in 7 ⅓ cups powdered sugar in three additions, adding 1-2 tbsp milk as needed to combine. Mix in 1 tbsp vanilla extract and a pinch of salt. Optionally, add 3 tbsp corn syrup for shine. Beat in 2 cups black cocoa powder, then beat in 12 ounces full-fat cream cheese *last* until well combined. Tip: If frosting becomes runny, chill the bowl in the fridge/freezer for 20 minutes to 2 hours to firm it up.
-
5. Assemble the Cake: Place the first cake layer on a stand (preferably with a turntable). Spread 1 ¼ cups (345 grams) of frosting over it, going slightly past the edge. Pipe a frosting border, then spread ⅓ cup raspberry preserves evenly within the border. Add the second cake layer. Spread any excess frosting to seal the layers. Chill for 10-15 minutes. Repeat with the second layer, chilling again. Add the third layer upside down for a flat top. Apply a thin crumb coat of frosting to the entire cake and chill for 30 minutes. Finally, frost the cake with the remaining frosting, smoothing with an offset spatula or cake scraper. Chill for at least 1 hour (or overnight) before decorating and serving.
-
6. Decorate (Optional Halloween Theme): For meringue ghosts, follow a Swiss Meringue Recipe (linked for guidance). Alternatively, cut 6 large marshmallows into ghost shapes with kitchen scissors. For spiderwebs, melt 5-8 marshmallows in a bowl for 10-20 seconds. Stir until cohesive, then cool slightly. With clean fingertips, stretch molten marshmallow around the cake to create a spiderweb effect. Arrange meringue or marshmallow ghosts on top, dotting eyes and mouths with 1 small tube of black gel frosting. Add ghosts *after* spiderwebs.
-
7. Serve & Store: Slice and enjoy your spooky, delicious cake! Store leftovers in an airtight container in the fridge for 3-4 days.
-
Make Ahead Tips: Cake layers can be made a day ahead, cooled completely, and stored tightly wrapped at room temperature overnight. Chocolate frosting can also be made a day ahead, stored covered in the fridge, and then re-beaten until creamy before use.
Notes
Nutrition
Calories: 1249kcal,
Carbohydrates: 194g,
Protein: 14g,
Fat: 53g,
Saturated Fat: 27g,
Polyunsaturated Fat: 7g,
Monounsaturated Fat: 14g,
Trans Fat: 1g,
Cholesterol: 170mg,
Sodium: 833mg,
Potassium: 587mg,
Fiber: 9g,
Sugar: 151g,
Vitamin A: 1386IU,
Vitamin C: 2mg,
Calcium: 191mg,
Iron: 4mg
Nutrition information is automatically calculated, so should only be used as an approximation.
Like this? Leave a comment below!